Followers

Wednesday, 23 January 2013

A New Project (3)

I know, I know, you're all desperate to know how the Polish/Dutch airfield attack project has progressed since the last update. Well, things are developing a little slower than I'd hoped (what a surprise!), but they are developing and I should be ready for a game in a couple of weeks. Craig has sent me a photo of the fallschirmjager he will be lending me, now fully painted and based to his usual very high standard. What a lad.


Two great things about having someone else provide these boys - their different style will make them stand out nicely on the table from the airlanding troops, and (much more importantly) I have been spared the expense and time of producing them. In fact, had Craig not stepped forward, the hassle of creating the extra troops may have stopped the project in its tracks at the outset.

The runways are now cut out and ready to go, and I have a couple of very nice card hangars downloaded and put together by Steve, who can do that sort of thing much better than I can. Six Zvezda Ju-52s arrived from Santa on Christmas day, and completing these is well under way. Three are finished, and the other 3 are made up and await painting. I have decided 8 will be needed for the game, but yes, you guessed it, a friend has stepped in to offer 2 more (Steve again). Frankly though, these little models are such a pleasure to build and paint I might be tempted to order up a couple more anyway. 

Anyway, the little airfield scene below gives you an idea of how things are looking. The Junkers even come with flight stands which will be perfect for depicting the arrival of the airlanding troops. You know, I think I should have a go at painting the frames on those cockpits.


Hoping to offer a battle report in the not too distant future, with a full scenario and force composition. Time to get painting!

Friday, 4 January 2013

The Combat of Strehla

This post is a tribute to the very wonderful Kronoskaf Seven Years War Project, which should be familiar to all SYW gamers. It is, of course, a magnificent collection of information on all aspects of the war. One of the best bits is the section on the various battles and smaller actions, which usually includes maps as well as force compositions.

It was in this section that I found details of the Combat of Strehla (1760), which looked like it would make an interesting wargames scenario. What resulted was really a wargame 'based on the Combat of Strehla' (as they say in the movies), rather than any kind of historical refight. I worked up the scenario quickly without too much detailed analysis, to create a game that would test out the latest tweaks to my rules. In summary, the Austro-Imperial forces outnumber the Prussians by 2 to 1, and they have resolved to attack, with the intention of destroying or driving off their opponents. Whilst the poor quality Reichsarmee formations demonstrate against the main Prussian position before Strehla, the better Austrian formations will make a flank attack from the west.

Back to a hand drawn map for this game. The small river between the Strehla plateau and the Durreberg
counts as a linear obstacle. The individual buildings outside Strehla suggest the positions of
surrounding villages, but are only for decoration. Table size 6' x 4'.

Forces
Note that the various commanders are all real officers who were involved in the battle, but one or two had to be juggled around to create the formation commanders I needed for my game.

Austro-Imperials (C-in-C Prince Zweibrucken)

 Austrian infantry under Prince Stohlberg
2 infantry battalions
2 grenadier battalions
1 artillery battery

Austrian cavalry under FmL Guasco
2 dragoon regiments                         

Austrian light infantry under GFwM von Kreefeld
2 grenz light infantry battalions
1 artillery battery

Reichsarmee infantry under GFwM von Wurzberg (dithering commander)
4 infantry battalions
2 artillery batteries

Reichsarmee cavalry under Colonel Zettwitz (dithering commander)
1 cuirassier regiment
1 dragoon regiment                                     Total 18 units   

 All the Reichsarmee units were rated 'inferior', apart from the cuirassier which were rated 'line'.

Prussians (C-in-C von Hulsen)

Left wing infantry under GM Braun
2 infantry  battalions
1 grenadier battalion
1 artillery battery
1 jager detachment (independent, occupying Strehla)

Right wing infantry under Major Lubath
1 infantry battalion
1 grenadier battalion
1 artillery battery

Cavalry under Colonel Kleist  (dashing commander)
1 dragoon regiment
1 hussar regiment                                        Total 10 units  


Victory Conditions
Turn limit is 8 turns. If the Prussians are not broken by the turn limit (i.e. they have not lost half their units), they have won. 

The Game
I was able to run through the game twice, once solo and once with my stalwart opponent Steve J. The first game ran to the full 8 moves, resulting in the Prussians hemmed in around Strehla but still unbroken and so technically the winners. The second saw the Austro-Imperials declared victorious in just 4 moves - the Prussians had lost 4 units and the only remaining unit of their right wing (the grenadiers) were cut off and bound to be destroyed trying to break through back to Strehla. 

Much depends on how the inevitable cavalry fight between the formations of Kleist and Guasco goes - if the Prussians gain the advantage here, they probably have a chance to win. A rapid sally out by units from behind the Prussian entrenchments in support of their right wing might be another game-winning tactic, but it didn't get tried in my games.

Game 1. The Prussian cavalry have driven back their Austrian counterparts, giving their side a chance of victory.

Game 1. The Reichasarmee infantry demonstrate against the Strehla entrenchments.
Any actual assault would stand little chance

Game 1. Prussian grenadiers suffer the ignominy of being chased through the woods of the Durreberg
by Austrian grenzers.

Game 1, final move. The Prussians have a solid position on the Strehla plateau.

Game 2. Kleist once again leads out his cavalry to support the beleaugured Prussian right wing.
The stream hampers and slows his movements.

Oops! Both Kleist's units are destroyed by the opposing cuirassiers. (I downgraded the latter to dragoons
in the final version of the opposing forces, in the cause of game balance)
The remaining Prussian units on the Durreberg are in a pickle.

Game 2. The red-uniformed Austrian grenzers seen on the Durreberg are about to take the
Prussian gunners there in the rear. I guess that's how they do things in the Balkans.

Game 2, final move. Strehla is still fairly secure, but the Prussians have lost too many units to win.

So there you have it. Historical scenarios often give you a nice alternative to just lining the opposing forces up opposite each other and having at it. Thanks to the boys at the SYW Project for once again providing me with information and inspiration. The internet is a wonderful thing!

Friday, 21 December 2012

Merry Christmas!

Here in the UK Friday 21st is the last working day before the holiday, for most people. Therefore it seemed appropriate to send Christmas wishes to all my readers and followers at this point. Thanks for visiting the blog, and thanks for your many kind and thoughtful comments.

Don't ask.

I guess wargamers have different reasons for starting and maintaining blogs. I have certainly found that creating and maintaining this blog has greatly increased my enjoyment of the hobby. It serves me as a very useful personal record of my activities, but increasingly I have enjoyed trying to broaden its appeal by making it more than just a journal of battles fought and figures painted. I have tried to make it relevant to a wider audience by including views and observations on the hobby (mainly under the 'Talking Wargaming' label) and by including some background in my after-action reports to give perspective and context to my games. I've also tried to start including maps of most games in the hope that they may be useful to other gamers, although to be honest I mainly just like maps.

Overall, my concept for the new year is to create something more like my own little wargames magazine. It will, of course, continue to be personal and parochial, but I believe the modest effort will be fun and worthwhile. I hope the blog will continue to be of some interest to visitors.

Finally, a modest Christmas gift in the form of the latest version of my rules. Of course, I appreciate that few of you (probably none of you!) will actually be playing the rules on your tabletops. Like me, you will download a free set of rules from the interweb in order to check out the concepts, and maybe to 'steal' the odd idea or two. This is all fine and dandy by me. Should any of you check them out in any detail, I am of course most interested in any comments on how you find them. Download them right here, and the playsheet here.


And so finally...

Merry Christmas and a Happy New Year!

Saturday, 15 December 2012

Story Of A Scenario

I have an old box file in which, over the years, I have kept a fair pile of old wargaming documents. They consist of old self-written rules, amendments to old published rulesets, maps of games, the occasional catalogue of long forgotten figure ranges, and (most preciously) a very few old hand-written battle reports. 

I haven't delved into the lower depths of this box file for a fair few years, but doing so recently I turned up the map below, nearly at the botom of the pile. It's the map I drew of my first 'proper' wargame, on the new wargame table my dad had made for me. I reckon this would be about 1972. Until then I'd been wargaming on the floor of my bedroom.


I can remember the terrain items clearly: cardboard river and roads, cardboard profile trees, lichen hedges, Bellona walls and bridges, Airfix fences, home made plastic card houses and stepped hills from polystyrene tiles. All on a reinforced hardboard table painted a lovely shiny green!

The table was 8' x 6' and the game was an ACW encounter using the obligatory Airfix figures. I have no record of the forces or the scenario, but the layout still looked pretty good to me even after all these years. Therefore I decided to make this the basis of the scenario for my next SYW bash. I thought I'd show you how the scenario subsequently developed in my head.

Table Size
I can just about squeeze an 8' x 6' table in my dining room, but it means moving furniture and dealing with a lot of other hassle. 6' x 4' is so much easier. The clincher for the smaller table was that I fancied a more crowded battlefield. I wanted all the toys out, and a 6' x 4' table would mean I could have a good dense layout of troops with second lines and reserves, giving a feeling of depth to each side's deployment. At least that was the plan.

Attack-Defence? Encounter?
I guess those are the two basic options for a table top battle. I decided to choose both - have one side attacking in one area of the battlefield (or at one stage of the battle), and the other side attacking in a different area, or at a different stage. This kind of thing is ideal to keep both sides really involved.

Terrain
I don't have the right hills for an identical terrain, so a little re-jigging would be needed. The Turnpike could go, making room for a ridge where North Hill is. South Hill also became a ridge. A reduced road network also made sense to me for the 18th century in central Europe as opposed to the 19th century in the USA. And of course the names on the map would need to change, or just be left out.

Deployment
Like a lot of wargamers, time can be tight for my home games. One way to save time is to have both sides (or most of both sides) already deployed and ready to go. This does mean less generalship can be used in deciding initial deployment and tactics, but it really can save a lot of time in deciding where those figures will go and actually putting them out. Another plus is that your visitor is presented with a table resplendent with toy soldiers all ready to go, which I feel is often a welcoming and tempting sight.

With all this in mind I set up the game as shown below (the map was botched up using Microsoft Office). The Austrians are preparing to attack the Prussians, who they believe they significantly outnumber. The Prussians are expecting a reinforcing grenadier brigade to arrive on their left flank.

Striped units are cavalry, triangles are artillery.

Austria

1. Infantry Centre
6 infantry battalions
4 medium artillery batteries

2Infantry Reserve
2 grenadier battalions
1 infantry battalion

3Left Flank Cavalry
2 cuirassier regiments

4Right Flank Cavalry (deficient commander)
2 dragoon regiments
2 hussar regiments

5. Light infantry
2 grenz battalions
1 light gun                                   22 units     
  
Prussia

A. Left Wing (distinguished commander)
4 grenadier battalions
2 medium artillery batteries

B. Right Wing
4 infantry battalions
1 frei-korps battalion
2 medium artillery batteries
1 hussar regiment (independent unit)

C. Cavalry
2 dragoon regiments
1 cuirassier regiment

D. Light infantry
2 jager detachments                     19 units     

The Game
I was quite pleased with the way the table looked after I'd set it up. With just about all the toys out on a smallish table it had the dense feel I was looking for.

Ready for action.

With the armies set up in close proximity, fighting commenced straight away.
Here the Prussian cavalry gets stuck in, brushing aside the Austrian light troops then
charging 2 artillery batteries in flank.The grenadiers arrive in the background. 

The Austrians attacked across the valley and the clash was bloody: my rules are designed to move things along quickly. By move 3 this was the result - 4 out of 6 attacking Austrian infantry units done for. You can see 3 of them fleeing back over the ridge to the right of the photo. The Prussians had been pushed back from their positions but had only lost one unit. The Austrian cuirassiers in the foreground were supposed to sweep the opposing Freikorps and Hussars from the field before attacking the Prussian flank - an idea that didn't work out due to poor command rolls.

The main Austrian cavalry force, led by their dithering commander, didn't react quickly enough to stop the Prussian grenadiers getting over the bridges. The grenadiers deployed into line and advanced, leaving the opposing cavalry with little choice but to steadily give way.

A rather bare looking Austrian centre. The Austrian cuirassiers have at last been successful, but without infantry support they can do nothing against the Prussian infantry behind the ridge. However, the Prussians themselves can do little more than shelter in the dead ground behind the ridge crest, which is still swept by Austrain artillery fire from 3 batteries.  In the background the lines of opposing infantry reform after confused fighting on the Prussian left flank.

Final positions after 5 moves. Prussian fire and the unstoppable advance of the Prussian grenadiers have triumphed, with the Austrian reserve seen bested in the background. The Austrians had lost 12 out of 22 units, and so their army was officially broken under my rules. The Prussians had lost 6 out of 19.

A most enjoyable, all-action game with intense fighting from the start. 5 moves had taken 2.5 hours to play out, which I'm happy with. The Austrians never recovered from their blasting at the start of the game when their centre attacked. The Prussians did have a bit of dice luck here - I'm going to try average dice for firing and melee to see if that reduces the role of chance a bit. Armies in my rules move by alternate brigades from each side, and I'm also thinking about introducing that system for firing rather than the simultaneous fire I use at the moment.

P.S.
On the subject of scenarios, this blog recommends the article on scenario design available on Bob Mackenzie's Web Page.

Sunday, 9 December 2012

A New Project (2)

You Need Friends...
So here's my advice. If you're starting a new wargaming project, and you have a couple of friends who are not only keen wargamers but professional-standard modellers... consult them first, especially before you buy stuff.

We've already seen how my buddy Craig is going to supply the fallschirmjager for this project. Then no sooner have I bought some plastic card and other bits and pieces for a scratch-built hangar than Steve points me towards a site which has a whole host of printed hangars, control towers and other buildings suitable for a WW2 airfield, available for free download. And then he says he'll put them together for me as well, as he's bound to be better at it. Nice! This is the stuff Steve made for his own recent game:


Perfect for what I need. Steve also had some Woodlands Scenics grass mat left over from a previous project which he let me have, so the grass mat I'd bought went back to Antics Model Shop. I spent the refund on some paints and a nice Zvezda 15mm Panzer II. This just keeps getting better and better.

Other Progress
The AA machine guns are completed - here's the kind of thing I was aiming for.

Those funny coloured uniforms are Dutch Army.

And this was the result:

I think the tripods are bit too high, but I only had standing figures available.
The Timecast house is also complete, as you can see. I think it makes a believable
 airfield office/workshop, as well as being a useful general building to add to my collection.

Also finished is the armoured car company.


Now I need to get up the courage to cut out those runways. Once it's done, it can't be undone. I only have enough mat for 1 attempt!

Additional Units
Craig and Steve also came up with some interesting ideas for expanding my German units.

These guys look angry. Should be perfect for storming that airfield.
But how many can you get in a Ju-52?

How many chutes to drop a dinosaur?

Oh yes. Airlanded Panzer Grenadier Mutant Gorillas, supported by Dinosaur Mounted Heavy Weapons. Fortunately Craig was on hand to bring some realism back into the project. I'll only be using the dinosaurs on the command bases. Let's not get silly here.

Stop Press
Apparently those gorillas are now available in 6mm. Excellent! Pygmy Panzer Grenadier Mutant Gorillas!

Let's rock!

Thursday, 29 November 2012

Dazed and Confused

Rules. One of the main driving forces of the hobby. The rules serve to animate your lovingly prepared figures: using a good set of rules which play easily and have an authentic feel is one of the great pleasures of miniatures wargaming.

I've been looking out for some new rules recently. Now, I'm proud to say I'm definitely not a wargames butterfly. I have my 2 periods, which I intend to stick with, and for me the pleasure is in knowing those 2 periods thoroughly, as well as bringing together a collection of figures and vehicles over time to which I have become quite attached. But that doesn't stop me looking out for new rules which might enhance my wargaming.

However, these days I'm finding the new rules thing a bit problematic. Not that there's any problem with choice. Indeed, I have seen some comments that the number of new rule sets is a bit bewildering, but this isn't my problem. Nor is there a problem with the rules themselves: it seems rules writers are brimming with ideas, and reviews of the new sets seem to indicate that plenty of fresh concepts are out there. My problem is finding a set of rules that are just that - a set of rules.

For example, I Ain't Been Shot Mum! version 3 has recently been released. Being a well known cheapskate I took the opportunity to pick up an old copy of version 2 (2005), for a couple of quid at my local show (Reveille II in Bristol). The book featured interesting and original ideas from those Lardie boys, although overall they were maybe not for me. But I find that, to use the rules, I need (yes, actually need) to buy a period specific supplement for important stuff like stats and card deck composition. So the IABSM rulebook isn't a set of rules, it's part of a set of rules. It's volume 1. I presume v.3 is the same.

I have also been looking at the new Battlegroup Kursk set. For an outstanding review, see here. As you'll see, it's 237 pages long, it's a modelling and painting guide, it's a 25 page history of the Kursk campaign, but... the rules only cover one year of one theatre of WW2. Want to play Poland 1939? You'll have to wait for (and pay for) the supplement. Might be out in a year or two.


Yes, I am a bit bewildered. We all know that more playable and generally simpler rules have been a notable development in wargaming for quite a while. 'Fast Play' is all over the cover of most recent sets. But paradoxically the rule books containing these simpler, fast play rules just keep getting bigger and bigger. A4 size, full colour, quite likely over 200 pages, but somehow incomplete. There's apparently just not enough room to include all you need for your period in these grand books. You'll just have to buy the supplement(s). Not to mention that using that encyclopedia-like tome at the wargames table might be bit inconvenient as well, especially if you're juggling the rulebook and the supplement whilst referring between them.

So there you are. Rules that are too much and yet not enough, at the same time. Marketing concepts seem to be getting in the way of a satisfactory product - getting in the way of utility, if you will. Maybe there are customers out there for someone who just wants to produce a rule set: minimum size, minimum fluff, maximum coverage. Customers for a rules author or a wargames company that can spell concise. But perhaps the profit margin just wouldn't be high enough. In fairness, I should add that my trawls around the interweb would indicate I'm in a minority on this. Most wargamers seem very happy with these recent rulebooks and intend to snap them up.

Funnily enough, if I ever did a third gaming period it would pobably be DBA, with a view to progressing to the 'Big Battle' variant. Ah, DBA... probably counts as Old School by now. A5 format, 52 closely typed pages covering 3500 years of history including army lists... Hmm. Perhaps that's going too far in the other direction. But make that an A4 format, a few more examples of play, and you're there. Fortunately for my bank account, I don't think I have the time to support 3 wargames periods.

And whilst I'm on the subject...
Battlegames continues to be the magazine for the thinking wargamer. On the subject of rules, columnist Neil Shuck suggested in issue 30 that maybe the way into a new period was to choose a set of rules that attracted you, and go from there. Let the rules decide. An interesting idea, I thought, but I wasn't sure I agreed. In issue 32, Mike Siggins helped me clarify my doubts by writing that he thought Saga was a good rule set, and the figures available were excellent, but having played a few games he had decided the Dark Ages was tactically a bit boring. Yes - to avoid disapointment, it's surely best to put the period first.

I believe that the way into a new period is by research - investigate the new period, get to know and understand it. That should be a pleasure in itself. Then check out the rules and figures afterwards.

Even if you're a butterfly, it's better to be an informed butterfly.


Tuesday, 27 November 2012

A New Project...

... but definitely not a new period. I don't have the time, money or motivation for a new period. But I have settled on a small, do-able project that will involve a modest number of purchases and a bit of scratch building.

Some years ago I had an idea about putting on a demo game at one of the shows, based on the German air assaults on the Dutch airfields around the Hague during the 1940 blitzkrieg. I never went ahead with it - just another idea shelved. But I recently came across some great information on these attacks, and once again I was thinking they would make a great game. But I had no desire to create battalions of Dutch infantry, plus heavy weapons and vehicles, to oppose the Germans - this would put far too much strain on my limited financial resources and (more importantly) my very slow rate of painting. I wanted to have this project finished promptly, and ready to play soon after Christmas.

The solution was straightforward enough - do the scenario, but transpose it to the Polish campaign. The most interesting aspects of each of the 3 airfield attacks could be amalgamated into one scenario, with the Poles standing in for the Dutch. It wasn't too fanciful to imagine similar attacks taking place against Polish airfields during 1939. And I mean really... Poles, Dutch, how many wargamers can tell the difference?...

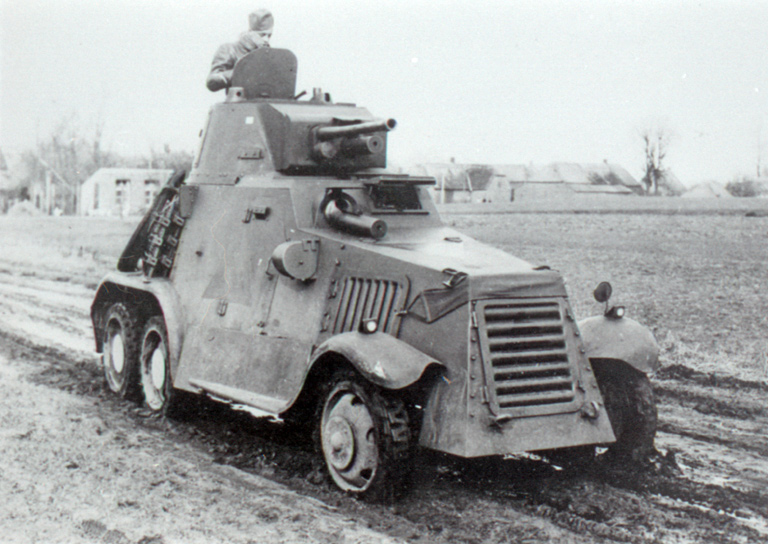
For the Dutch M36...
...substitute the Polish Wz.29. Simples!
The Scenario
Those interested in the details of the real actions should visit the link already given above. Briefly, I would need an airfield to attack, but also sufficient surrounding area to allow for some off-airfield manoeuvre. This latter area would accomodate the arrival of reinforcements, parachute drop zones and maybe one or two secondary objectives. I settled on a 6' x 6' table formed of nine 2' TSS tiles, with the airfield located roughly in the middle.

I also needed to work out a rough sequence of events for the scenario, based on what actually took place. So we start with a lightly defended Dutch/Polish airfield. Around dawn, the Germans commence their attack with a bombing raid and the dropping of parachute troops at DZs just off the airfield. Very shortly after, units from an airlanding division arrive in Ju-52s, in 2 or 3 waves. At some point, Polish/Dutch reinforcements should also start to arrive, including artillery support as well as a bombing raid against the German aircraft now littering the area. These various forces would then fight it out for possession of the airfield plus (as in the real attacks) at least one secondary objective, probably a bridge over a river or canal.

Burning Ju-52s at Ypenburg. German aircraft losses were heavy.
Ju-52 hit by Dutch AA fire.

Balance of forces would be decided by the real battles, tweaked to give as fair an action as possible, and also guided by the parameters of the 'airborne assault' scenario in the BKC rulebook. Most of the figures used I would already have (Polish and German infantry). Vehicles and heavy weapons needed would be limited - the former would only be fielded by the Dutch/Polish. So what would I need to acquire over and above what I already had?

Terrain
The actual airfields were all grass. Whether they had marked runways I don't know - airfields in those days tended to be just big grass areas. However, a couple of grass runways would give a nice impression of an aerodrome. Therefore I would purchase some sort of terrain mat from which I would cut out the runways, and these would then contrast nicely with the normal table surface. A runway length of 50cm would fit the intended space nicely and would scale to real runways 1000yards long - a reasonable length. I settled on the Woodland Scenics Small Summer Grass Mat.
Destroyed Ju-52s at Valkenburg, showing the type of grass airfields involved.
The airfield boundary could easily be suggested by roads, fences, hedges and tree lines formed from terrain I already had. The available field defences were also no problem. Some airfield buildings would, however, definitely be needed and these would have to be acquired. In the end I settled on making a scratch built hangar, which would stand alongside a suitable building bought from Timecast. These would form a very basic 'airfield built up area', which I could enhance with a model of a Polish Karas light bomber which was sitting unmade in my 'bits' drawer. The rest of the terrain outside the airfield could easily be created from my normal stock.

Figures and Vehicles
As for figures, I had enough German infantry for a couple of airlanding battalions, and plenty of Poles. The only problem was the Fallschirmjager. Step forward the very lovely Craig of Tiny Terrain, a wargames buddy who has offered to lend me his collection of German paras. Late war, but let's not be fussy! Much more importantly, if they're Craig's, I know they'll be beautifully painted. So that's sorted.

That's Craig, third from left.

I intend to put together a couple of AA mgs for the defenders, to fight alongside an existing Bofors 40mm - once again, I can cobble something together from the bits and bobs tray.

Vehicles: not many needed. A company of Dutch armoured cars were involved at Ypenburg, so I decided to add a Polish Wz.34 and Wz.29 to my list of purchases, to join a Wz.34 I already have.

Most importantly, how about those Ju-52s? 1/100th scale models would be too big and expensive (I wanted at least 4, preferably 6). 1/144th scale models might be ideal, and are available to purchase, but they're still around £15 each including p+p, making £90 for 6. No way. This time it was the Russians to the rescue, when I discovered that Zvezda do a 1/200th Ju-52 kit which you can get for about £2.50. Wingspan is 6", which will do the job. What the hell, maybe I'll buy 8.

Tasty...

With a bit of luck, I hope to keep my purchases within about £50, including modelling materials and the terrain mat.

The Story So Far
I have the terrain mat and materials for the hangar, bought from my (fairly) local model store, Antics in Bristol. The building from Timecast has arrived and is undercoated. The 2 armoured cars have also been purchased from Old Glory UK, who are UK stockists for True North Miniatures. I'll get all these sorted out before allowing myself the luxury of purchasing the Junkers. It's always tempting to buy everything at once, but a little discipline is called for when your budget is tight. And impulse buying is likely to grow one's lead mountain, which none of us needs.

To close, here's the Wz.29 model completed and undercoated.

The commander and turret hatches had to be added, as well as the 2 machine guns,
 the unusual arrangement of which is a distinct part of the vehicle's character.
But not a bad model for its age, and the only one available in 15mm size.

Updates to follow!