Followers

Saturday, 23 April 2011

Being An Entertainment With Toy Soldiers Representing The Battle of Hochkirch (Part 1)


So, how far can a real battle be downsized to fit one's resources, and still be a worthwhile representation of the original? When I had a go at Lobositz at Colours 2010 (see older post) I ended up using a rough scale of a wargames battalion to represent 3 actual battalions. I thought the result still gave quite a good feel of the original action. 

I have picked Hochkirch (14th October 1758) for my next effort. I found it particularly interesting as the Austrians not only attacked, but won as well, even with Frederick in charge of the Prussians. They also had a pretty interesting plan, manoeuvring around Frederick's camp and attacking it from 3 directions at once. Unfortunately, whilst the Prussian army was about the same size as at Lobositz (around 30,000) the Austrian army was more than twice as strong, around 80,000. To represent an army of 80,000 men I could, of course, paint a lot more Austrian units and use a much bigger table than the 8' x 6' which is the biggest I usually use. But I am only a small time wargamer with limited time and enthusiasm, so I decided I would take the obvious course: stick to an 8' x 6' table and increase the number of real units represented by each wargames unit.

My main sources for the refight were the account on the Kronoskaf SYW website and Frank Chandler's Volley and Bayonet scenario book, Battles of the Seven Years War. Of course the great thing these days is that a simple Google search will give you a number of results for 'Battle of Hochkirch', so I was able to see how a few other people had handled the action, most notably the 2009 post on James Roach's 'Olicanalads Games' blog. And for atmosphere you have to read Thomas Carlyle's account of the battle from his History of Friedrich II, which is also conveniently available online. After a good deal of poring over OOBs and maps, I came up with forces and a layout that fitted the table and models I had available. 

The map of my layout is seen below, with the Prussian deployment marked. To fit the battle into the available space more easily, the battlefield was twisted slightly, so that north is offset as shown. In the end, 5 battalions of infantry and 3 regiments of cavalry, plus 2 small detachments of Jager, stood in for an army of 30,000 men, on a ratio of around 5-6 real units for each on-table unit. A bit modest, you might think, but I felt the overall shape and tactical feel of the battle would be retained. At this ratio, battalions become brigades and brigades become wings.
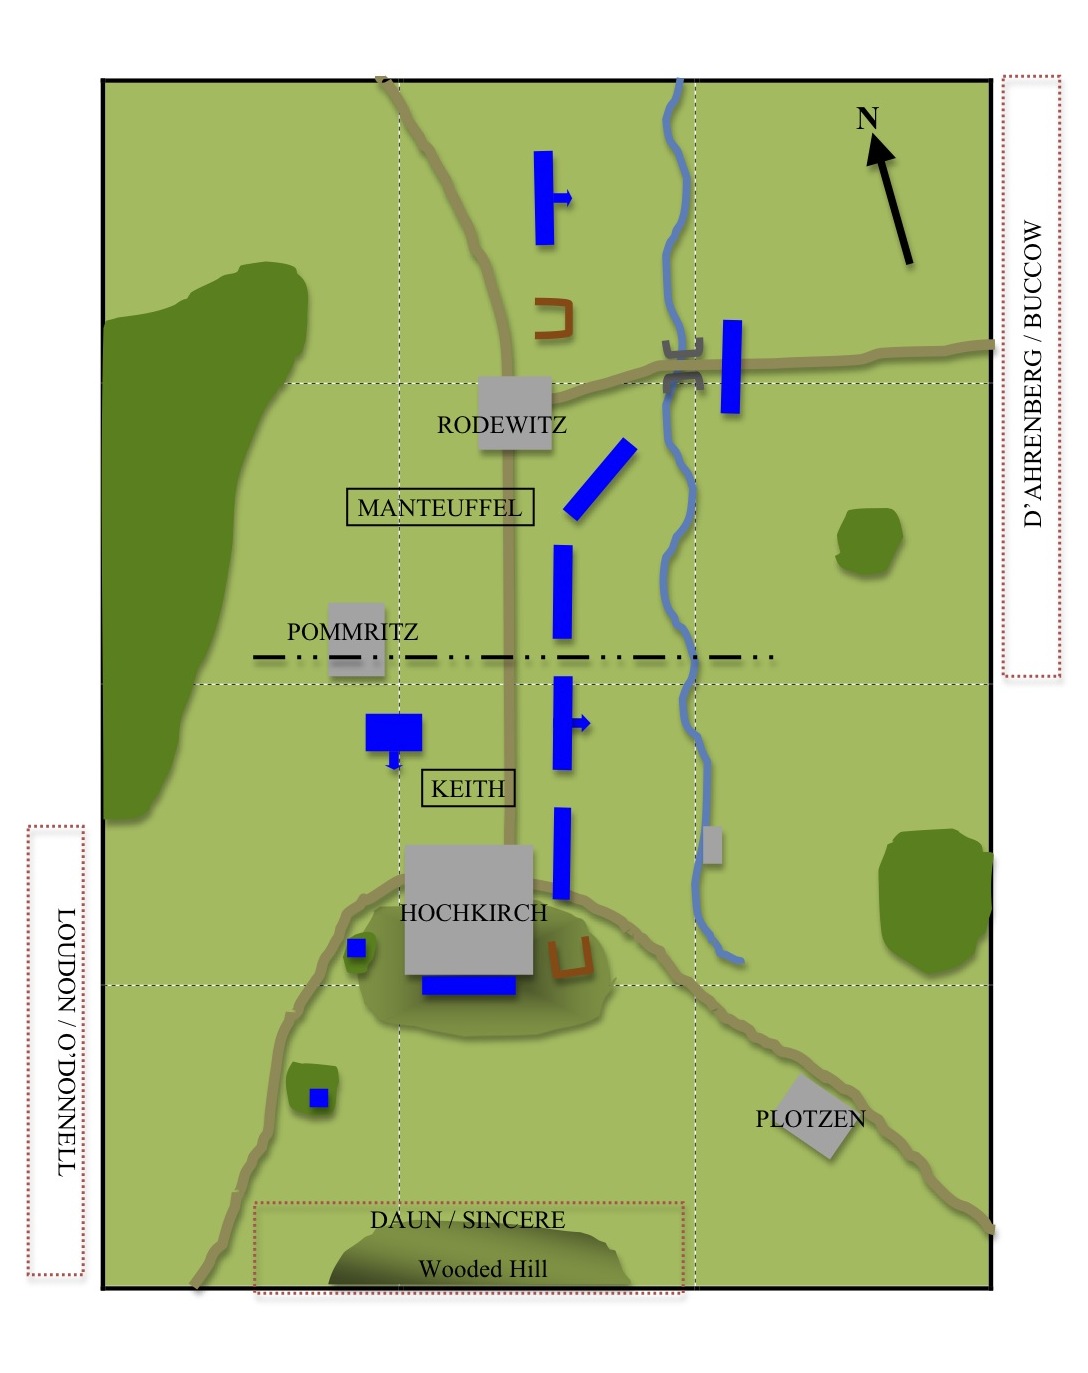
Terrain notes: the stream is a linear obstacle and counts as cover. Woods may be moved through at half pace by formed units or at full pace by light infantry. Hills can be moved on at full pace by all units. Both Prussian artillery batteries are in fieldworks, marked in brown. (Dark green areas are woods, the olive green shaded areas hills).

Of course, I had to make arbitrary decisions about the command structure on each side, bearing in mind I would be using Black Powder. The organisation I ended up with is below. As I have said, the 'wings' will count as Black Powder brigades.

Prussia

C-in-C: Frederick II (SR10)

Left Wing: Generallieutenant Manteuffell (SR9)
1 grenadier battalion
2 line infantry battalions
1 cuirassier regiment
1 medium battery

Right Wing: Feldmarschall James Keith (SR9)
1 Grenadier battalion
1 line infantry battalion
1 cuirassier regiment
1 dragoon regiment
2 jager detachments
1 medium battery

The division between the 2 wings at initial deployment is shown on the map by the dotted and dashed line through Pommritz. Cavalry units on the map have an arrow to their front. In line with the actual battle, Manteuffell's grenadiers should be the unit guarding the bridge in the north-east, whilst Keith's grenadiers should be the unit placed in front of Hochkirch itself. The two jager detachments are classed as 'tiny' for BP and represent the jager and freikorps units deployed to protect Frederick's right wing, south-west of Hochkirch. Frederick starts the battle within 8" of the centre of Rodewitz and must remain in the north half of the table for the first 3 moves, until he realises the attack to the south is serious.

Austria

C-in-C: Feldmarschall Leopold Daun (SR9)

Left Wing: Feldmarschall-Lieutenant Loudon (SR9)
                  assisted by General de Kavallerie O'Donnell (SR8)
1 line infantry battalion
1 grenz light infantry regiment
1 cuirassier regiment
1 hussar regiment

Centre: Feldzugmeister Sincere (SR8)
2 grenadier battalions
3 line infantry battalions
1 medium battery
1 heavy battery

Right Wing: Feldzugmeister D'Ahrenberg (SR7)
                    assisted by General de Kavallerie Buccow (SR7)
3 line infantry battalions
1 grenz light infantry battalion
1 cuirassier regiment
1 dragoon regiment
2 medium batteries

Daun is with Sincere commanding the centre. This represents the main body of the army, which will initiate the attack. They are deployed in the area shown at game start, up to 9" from their baseline. The Austrian left wing can arrive from move 3 along the stretch of baseline indicated, subject to a successful command roll. The right wing can arrive along their bit of baseline from move 5, also dependent on successful command rolls. The lower staff rating of the right wing generals is based on the slow movement of this wing in the real battle, which was affected by a Prussian flank threat from the north. These Prussian flanking forces (for students of the battle, those under Retzow) didn't actually get involved in the battle and are well off table, so are not represented.

The additional commanders listed for the Austrian left and right wings are an attempt to recreate the original command structure a little more closely. In both cases, the assistant commanders can only issue orders to cavalry units, whilst the main commanders can order any unit in their wings. O'Donnell's cavalry should deploy on the left of Loudon's wing, Buccow's cavalry on the right of D'Ahrenberg's wing.

Scenario Conditions
The battle commenced at 0500, ending with a general Prussian retreat at around 1000. My guess for game length would be 10 turns. 

The initial attack on Frederick's right wing opened in darkness, fog and mist, so the following rules are in force for the first 4 moves (dawn at this time of the year in Germany is roughly between 0700 and 0730). During these initial moves there is an extra -1 command modifier for ordering units more than 8" from the command base (remember I reduce all rulebook distances by one third, so this equates to the normal 12" command distance). There is also a -1 extra fire modifier for any fire beyond 6" in the first 2 moves, and beyond 12" in moves 3 and 4. No charges may occur from a distance of greater than 6" in the first 2 moves, or 12" in moves 3 and 4.

Any artillery defeated in melee by the Austrians may be captured and used against its former owners (copying events in the real battle). This will require a successful order from the nearest command figure.

This is actually a fairly small battle in BP terms, so to keep it going I will be using amended brigade morale rules. Each wing/centre formation counts as a single brigade. Units only count as lost for formation morale when they are destroyed or have left the table and cannot return. Each army seeks to win the battle by breaking the opposing force. The Austrian army is broken when 2 of its 3 formations are broken. The Prussian army will only break when both its formations have broken.

Below are some photos I took when I made a practice set-up. The building on the near base edge of the top photo represented the village of Laske, but subsequently I decided to leave this village out and instead represent Plotzen (to the south-east of Hochkirch), along with the associated road. I placed all Austrian units on table merely to test the deployment areas.


Part 2 of this post will be the refight itself. I intend to take this battle to Colours 2011 in September, but of course would hope to playtest it well before then! I'll keep you, erm, posted.


Happy Easter!

Saturday, 12 March 2011

Grenadier-Battalion Grun Loudon


Sometimes known as Loudon's Frei-Corps. This is a unit I have quickly knocked up in the 10 days since I posted those Hussar pictures. And if you believe that you will believe anything. I actually started work on these figures in November last year, and have just finished the last base. The frightening thing is, some people actually would produce a unit like this (only better) in a few days. Ho hum.


The figures are of course RSM 95 Austrian musketeers, with the pom-poms removed as these were not present on the originals. The standard bearer is an exception: he is one of the Spanish infantry figures RSM now stock - I just happened to have him lying around from a small order of sample figures. Whether the unit actually had a flag I could not find out, but I thought they deserved one. The flag itself was printed free from an online source.

Although called grenadiers, as you can see there is not a mitre or busby in sight. General Loudon apparently thought calling the unit 'grenadiers' might improve recruitment. The unit was to be formed mainly from foreign recruits, including enemy deserters, and was intended to support Austrian light infantry by providing them with formed infantry back up. They seem to have been reasonably successful, so I will class them as standard line infantry.

Despite the shine, these figures are finished with a coat of Windsor and Newton matt acrylic varnish. If I had bought the product to get a nice matt finish I would have taken it back to the shop: what you actually get a is a nice subdued slightly-gloss effect. Luckily, I find this just right. 

I like this unit. It makes a change from the usual Austrian white and is likely to enhance the look of my games. My next move is going to be to order some more hussars, but this time from Minden Miniatures. Meanwhile, I have some Prussian grenadiers lying around unpainted, and I have decided to create IR6, the Garde-Grenadier battalion. This will be fun as the unit was an elite one, all grenadiers, and was derived from the battalion of giants recruited by Frederick's father, sometimes known as the Potsdam Grenadiers. Not being a converged unit, one gets the advantage of a grenadier battalion which has a flag. And according to the Kronoskaf SYW Project, the flagpoles were yellow. Nice.

Saturday, 5 March 2011

Black Powder and the Prussians


My Black Powder stats have been amended recently, mainly as a result of reading the book shown below: Frederick the Great on the Art of War, edited by Jay Luvaas.


I can't really understand why this work doesn't get more publicity. Professor Luvaas wrote and edited this book in 1966 whilst teaching military history at Allegheny College. He was a mere Doctor at the time, but went on to hold Professorships at the US Military Academy, US Army Military Institute and the US Army War College. He retired in 1995 and died in 2009. Here he has taken on all Frederick's writings on military subjects and edited them into a themed and well ordered book, adding some judicious analysis and comment of his own. This is my kind of book: scholarly but easy to get to grips with. The book has recently been republished in paperback and is easily available in this form on Amazon for under a tenner. However, the original hardback is much more satisfying to own and I managed to pick one up for much the same price from the same website. 

I would categorise this book as a must-have for anyone desiring to understand 18th century warfare, along with the works of Duffy, and Nosworthy's Anatomy of Victory. And by the way, it is not to be confused with the work available through Caliver Books, Frederick the Great's Instructions to his Generals, edited by a chap called Hayes. This latter work only has 80 pages (Luvaas' has 391) and only covers the work stated in the title. The Instructions were written before the SYW and do not cover Frederick's later thoughts on warfare developed through his experience of that dreadful conflict. Thanks to Professor Luvaas we can hear the authentic voice of the greatest practitioner of 18th century warfare, 250 years after he committed his thoughts to paper.

Anyway, one of the points made loud and clear is that the tactical superiority of the Prussian army was founded on its ability to manoeuvre better and shoot better than its opponents.  Hardly a stunning conclusion, you will think; but it was having this point drummed home to me through this book that I decided to make a few amendments to my stats tables. The superiority in manoeuvre is covered in the rules mainly by giving the Prussians a higher staff rating. I feel this is essential and has to be done, or you might as well be playing fantasy or imagi-nations (both highly respectable forms of wargaming but not what I am discussing here). In addition, it is tempting to give the Prussians special rules, such as 'superbly drilled', but I have not taken this route. The 'reliable' rule, for example, seems pointless if you have already decided the army justifies higher staff ratings all round. As for firing, the book informs the reader that even conservative estimates allow the Prussians 4 volleys a minute against 2 or 3 for most other nations. Frederick himself was much more bullish, claiming a 3 times superiority in firing for his infantry. Of course, the figures for rate of fire are subject to some dispute but I have accepted that the Prussian advantage was real and significant.

Therefore, all Prussian regular formed infantry get 4 firing dice instead of 3. 'First Fire' is given to all decent quality infantry units of both the Prussian and Austrian armies as representing a basic tactic of the time (the Bavarians and Frei-Korps miss out on this). 'Superbly Drilled' is reserved for grenadiers to give them an edge in reliability, making them additionally suitable for their historic role of undertaking the most difficult attacks. I have made no changes to the cavalry, remaining convinced that the Prussians have the edge, and continuing to refuse the use of the 'heavy cavalry' rule. Note that I have decided to have the option of fielding 3 types of artillery; light, medium or heavy. I decided to differentiate these purely by range and ease of movement. Ranges are given in the tables. Light guns will count as the battalion guns mentioned in the rules for manhandling, whilst heavy guns cannot be manhandled. Medium and heavy guns will move limbered as per the rules, but light guns will get the movement for horse artillery. Finally, Frederick himself, if present, always gets a staff rating of 10.


All comments welcomed, of course, especially those disagreeing with my conclusions. Wargaming is a learning process, like any good hobby.

Wednesday, 2 March 2011

HR 7 The Yellow Hussars, and Husaren Regiment Splenyi


The painting of new SYW units continues to creak along at a slow pace. Recently completed are these two Hussar units, one for the Prussians and one for the Austrians. You will notice I have solved the problem of painting Hussar lace by ignoring it completely. Not a tip I would recommend, but that kind of fiddling around is just too much for my meagre skills and even more meagre will-power. 
Note the Austrian unit has a standard whilst the Prussian unit does not, which I believe is historically correct. The RSM95 range doesn't have Hussar officers, so officers are designated by a rearing horse and some very minor conversion work (plus some nice yellow boots).

Austrian Splenyi Hussars

Prussian Hussar Regiment 7

The release of dismounted Hussar figures from Minden Miniatures is tempting me to add a dismounted option for these units. It's well past time I got a few figures from that manufacturer into my armies. And the choice of dismounted cavalry should be just the ticket for those smaller scenarios featuring La Petite Guerre (or Der Kleine Krieg if you prefer). 

Cheers for now!


Sunday, 27 February 2011

Memory Lane


Rooting around in my wargames storage cabinets (good old IKEA) I found some photos of old games going back nearly 25 years. Knowing that many present day wargamers are of my vintage, I thought it might be fun to share a selection with readers of this blog. Ah, nostalgia! All the photos have been scanned in so a little quality has been lost.

This one is marked 1987. Back in those days I was wargaming late WW2 and occasionally ACW, both with Airfix plastics. Sadly, no photos of my ACW games ever got taken but this shows what my WW2 games looked like. Airfix figures on individual bases, with the odd Matchbox figure added. Note the US Marine bottom left, painted to represent a German radio operator, with plasticine blob radio just as Mr Featherstone's books had recommended. Home made buildings and plasticine trenches. Of course, any gentleman wargamer will recognise the Bellona walls and bridge. The bridge at least is still with me. At this time I was using Charles Grants rules from his Battle - Practical Wargaming book.


The two pictures below date from a couple of years later. I've still got essentially the same figures but new buildings and trees. Dig that gloss painted board! I had begun to branch out into some new resin vehicles, like the Loyd Carrier in the lower picture. The Charles Grant rules got modified and modified again until almost unrecognisable. I only played commercial sets when playing away with other gamers. Eventually I ended up with what were really my own WW2 rules which (I eventually realised) became far too complex.


In a while the board got a couple of coats of matt varnish. The 3 photos below are from a game based on Operation Goodwood. Those Infantry Combat Group figures are still going. Note that I couldn't be bothered to paint them properly - just the detail was painted in (packs, boots, rifles etc). And a pretty basic job on those Shermans and half tracks as well.


Fast forward a year or so (around 1990) and the figures are on multiple bases. Nevertheless, you'll see that most of the German figures are still the WW2 German Infantry designed in the 1960s (and purchased by me in the 60s and 70s) The odd resin building is creeping in, but the ceiling-tile hill contours continue to give sterling service.


Below again: new house, new kit. For a brief few years I actually had a good size loft to game in. TSS tiles were acquired and the old figures were gradually replaced by metal 20mm. Cardboard roads were still quite good enough, however. Still, not a bad looking table I think. The whole 20mm WW2 collection was sold off in the late 90s to make way for my current collections. The ACW Airfix had gone many years before - probably straight into the bin.


Finally, 2 photos below of a Napoleonic game (from 1989-90 I reckon). A wargames buddy had a much nicer set-up than mine, with a hexagonal tile system and really well painted 15mm Napoleonics from the Peninsular campaign. We used WRG 1685-1845 rules. I wouldn't touch those rules with a barge pole these days (though it seems many still use them) but in those days I recall enjoying the games we played, even if they were occasionally rather slow when all the figures were out.


And that's about it. How I wish I had taken some photos in the 70s and early 80s. Only some hand written rules and one or two scribbled maps endure from the 70s, and one or two hand written battle reports with maps from the 80s.

Hope this has been of some interest. Will get up to date with the next post, with photos of some recently painted SYW Hussars. Byee!


Friday, 11 February 2011

Kradschutzen Vorwarts!


Inspired to represent an action by German motorcycle infantry (or kradschutzen, see previous post), I came up with the following scenario.

Kradschutzen Vorwarts!
(motorcycle infantry, advance!)
September 1939. German motorcycle troops, supported by a reconnaissance battalion, rush to seize an important bridge before the Poles can claim it for themselves.

German Forces: CO (CV9)

Kradschutzen Battalion: HQ (CV8)
6 motorcycle infantry units (ATR upgrade)
2 MG units in motorcycles
1 mortar unit in light truck
1 37mm ATG unit with truck tow
1 assault engineer unit (ATR upgrade) in light truck

Aufklarungs Battalion: HQ (CV8)
1 Sdkfz 221 (recce)
1 Sdkfz 222
1 Sdkfz 231
3 motorcycle infantry units (ATR upgrade)
1 MG unit in motorcycle
1 75mm IG with truck tow
1 37mm ATG with truck tow

1675 points.    Breakpoint = 10

Polish Forces: CO (CV8)

Cavalry Regiment HQ (CV8)
9 cavalry units (veteran infantry, ATR upgrade)
2 MG units in taczankas
1 37mm ATG with horse tow

Divisional Recce Group HQ (CV7)
1 Wz.34 armoured car (recce)
2 TKS (mg)
3 motorcycle infantry units (ATR upgrade)
1 MG unit in Lazik jeep

Improvised Tank/Infantry Group HQ (CV7)
1 infantry recce unit in Lazik jeep (recce)
2 FT-17 (37mm)
6 infantry units (ATR upgrade)
1 MG unit
1 mortar unit
1 75mm artillery support unit with horse tow

2245 points.    Breakpoint = 15

The map for the game is shown below, using a 6' x 6' table. For a change I decided to make up a basic map in colour using Microsoft Word, which was actually easier than I feared. In fact I was pleasantly surprised at how little swearing and cursing was required to make the software behave as required.
The idea is that the stars of our show, the Kradschutzen Battalion, automatically arrive in column on road A at the start of the game, and have 2 free moves to make for the bridge (command rolls permitting). On move 3, their supporting Aufklarungs Battalion can enter along the same road, but using mobile deployment to arrive.
The Poles can also start to arrive on move 3. One Polish formation is allocated to each of the roads B, C, or D by dice rolls, entering the table in column by mobile deployment.
The German CO can try to arrive from game start on road A using mobile deployment. The Polish CO can be allocated by the Polish player to any road or formation at the start of move 3, but must also use mobile deployment to arrive.
Game length was set at 8 turns. The bridge and ford count as a single objective, and the side occupying the objective at the end of the game wins, unless either side has broken in the meantime. The ford can be crossed by any unit but attracts the dense terrain command modifier.


The Game in Pictures

 The table is set up and ready to go.

 The motorcyclists arrive along with the CO and are able to move forward.

 But there is a delay - the lead unit encounters a stray mine on the road and is knocked out (command blunder with a roll of 5). They managed to overcome this setback but after 2 turns the motorcyclists are still not quite at the bridge.

 The Polish tank/infantry group arrives straight away on move 3. The Poles have a -1 command penalty for ordering combined infantry/tank formations, so the CO accompanies them to keep things moving.

 The cavalry also arrive smartly. They ended up being lucky with their command rolls throughout the game, and they moved rapidly towards the objective.

 The Germans, however, beat them to the bridge and ford. The bad news is that the Aufklarungs Battalion stubbornly fail to arrive.

 The Polish cavalry move forward bravely and deploy to attack the bridge.

 The Germans dismount from their motorcycles and trucks and set up a modest bridgehead.They are able to knock out an advancing Polish recce unit with MG and small arms fire.

 But then there is a mix up in  orders (yes, another command blunder), and the formation falls back a move, handing the initiative to the Poles.

 Meanwhile, on Rollbahn A, the second in command of the Aufklarungs Battalion stares down the road. Where have the buggers got to? Surely they're not lost? Whatever the reason, the recce formation still doesn't arrive.

 Close up of support units from the Polish cavalry regiment in action against the bridge.

 The Polish recce formation was not much more lively than their German opposite numbers. Their arrival  was delayed, and then their movement towards the bridge was sluggish in the extreme. They never got into the fight.

 The Polish cavalry, with further tanks and infantry coming in slowly from their left, form a firing line and pour fire onto the isolated German motorcyclists. The extra firing dice for veteran infantry is of great value to them, and the outgunned Germans lose units continuously.

 The Polish tank/infantry formation moves forward slowly, but steadily. The CO took personal command of the 2 tanks. Eventually the tanks and the 75mm were able to commence shelling the German positions around the bridge as the infantry edged forward.

 At last the Aufklarungs Battalion arrive. But they may be too late to save their comrades. Mortar from motorcycle battalion in foreground.

 A tragic end to a bold advance. The Kradschutzen at the bridge have been wiped out by a storm of Polish fire, and now the dismounted cavalry swarm forward to claim the objective. 

 The German armoured cars come in sight of the bridge, only to see it covered in enemy infantry.

 Close up of the FT-17s and 75mm gun supporting the final cavalry advance.

 The Polish recce formation has hardly moved at all by the end of the game.

 Final move, and a Polish victory. The game went by quicker than we expected, so in the end we played 10 moves. The Poles were pretty much in control of the objective after 8 moves, and during the extra 2 turns they consolidated their advantage. The Aufklarungs Battalion approached the bridge but ran out of steam as they encountered some solid Polish small arms and ATG fire.

 Alternative view of the last move. Well done the Poles!


Postscript
A pretty conclusive victory for the Poles. The motorcycle battalion was completely wiped out, and the Germans ended the game with casualties of 11/10. The Poles had not suffered badly, only losing 4/15.
The army lists allow some Polish HQs to have a CV of 8 and it was well worth giving this rating to the Polish cavalry, helping them get into the game. At the minor tactical level the best Polish troops were at least the equal of the Germans in 1939, and the Polish cavalry were the elite of their army. For the record, all the Polish horse tows were allowed to move at cavalry speed. Video evidence I have seen on the net shows taczankas and towed 37mm guns galloping around at a great rate with their cavalry colleagues. On the practical side, if you make the horse-towed support weapons move at draught horse speed the cavalry formations become very difficult to use in their historical role.
Both players agreed this scenario would be well worth playing again with the roles reversed (on this occasion I was the Germans). It is one of those games which will be different each time depending on how the arrivals work out. I certainly didn't expect the German and Polish recce units to be so sluggish.
Finally, the evening passed even more pleasantly due to a highly acceptable Le Pre du Moine 2009 Bordeaux provided (as always) by Paul. That man knows his wine!


www.youtube.com/watch?v=ul7otLd1z_o&playnext=1&list=PLE55417C6764CF3B2

Thursday, 3 February 2011

WW2 - German Motorcycle Riflemen (Jan 1941)


I was pointed towards this video by a post on the BKC forum: thanks to Steve Johnson for the link. The video got me looking up my material on German motorcycle troops (Kradschutzen). Consider this quote from September Storm:

Motorcycle rifle battalions were employed for reconnaissance and as exploitation units. Their high-speed mobility and good cross country capabilities allowed them to take advantage of many situations in which it was necessary to gain a quick advantage, such as seizing an abandoned bridge, securing a vital crossroads in advance of the main body, or screening an exposed flank...

Enough there for at least 3 scenarios. And from Panzer Divisions: The Blitzkrieg Years 1939-1940, concerning the Kradschutzen battalion in the Panzer Divisions:

Its speed and its capacity to redeploy quickly made it the natural spearhead of the Schutzen Brigade, and it was often used in offensive reconnaissance missions.

Hmm.... 'seizing an abandoned bridge'. That sounds fun. Well, the scenario is in preparation for a game next week. Full story and pictures soon after. Meanwhile, enjoy the video.