Followers

Monday 28 December 2020

Built Up Areas - Horse and Musket Wargaming

Well, I hope everyone had a good Christmas, or as good as could be expected in the circumstances. I thought I would use the relaxing period between Christmas and New Year to reflect on the way I represent towns and villages in my Horse and Musket gaming, in the hope it might be of some use to other gamers.

Back in the day (in my case the 1960s), what we now commonly call 'built up areas' were referred to simply as 'houses' in most rules. Usually each house was treated separately, with a set number of figures allowed in each, and there were special rules for assaulting these houses and fighting over them. This could all be good fun, but could also be rather time consuming. Of course, such an approach has carried over into the present time for skirmish level gaming, where each figure is one soldier and a single house really does represent just one house.

For bigger games, it made sense to many gamers to have villages and towns represented by a set and well-defined area, including of course some house models, within which all units were deemed to be inside a BUA. The BUA could then be fought over in a more generic and quicker way, with simpler rules. It has suited some rules writers, myself included (in Honours of War) and rather more famously in Black Powder, to have BUAs of set sizes able to accommodate set numbers of units. Once again this has to do with making the gaming rules work in a straightforward way.

I personally now find that approach unnecessarily artificial, and have moved on to treating BUAs in almost exactly the same way as woods, marshes or bad ground. That is, set out an area of terrain designated as a town or village with its outline clearly indicated, and write some simple rules for moving and fighting in that type of terrain. Then, use the terrain as you would a wood, etc. - it accommodates as many units as can be physically fitted into it, with the houses, walls and trees within able to be moved around if needed to allow the placing of units conveniently for gaming. 

For the delectation of readers, I thought I would show how I construct my BUAs in practice, using a series of photos. I start by placing down one of Metcalfe's OO/HO scale cobblestone sheets, which can easily be cut to various sizes or combined to make larger areas.


Then, some house are placed down, leaving plenty of open space to deploy units.


A bit more decoration can then be added, including trees...


...and walling.


Then you're ready for the defenders to move in. As you can see I use 16 figures to represent a typical 600 man battalion, which is a figure ratio of about 1:35.


Of course, it's not necessary to limit the BUA to the exact size and shape of the original base. The area can be juggled with, extended or re-shaped by using various terrain pieces.


And that concludes the demonstration. Yeah, I know, hardly rocket science. But such an approach is easy to use in a wargame, as you can fight opposing units in the same way you fight them in open ground, having them move here and there, advancing and falling back as the fighting ebbs and flows, rather than having rather artificial and specific rules for BUAs which can become complex and need to be understood separately from those relating to other terrain pieces. 

It can be convenient to use objective markers to show clearly which side is judged to be in control of the BUA. My own rule is that one side must have at least one unit 3" or less from the marker whilst there are no enemy units 6" or less from the marker. This easy-to-use rule is borrowed ('stolen' is such an ugly word) from Battlegroup Blitzkrieg.

My only other advice would be, don't write rules or use rules that make attacking a BUA too difficult. It was common for villages to change hands several times in a large battle, and having this happen in a wargame is good fun. On the other hand, long, drawn-out fights where the chance of seizing a BUA is minimal make for dull gaming.

So there we are then. It only remains for me to wish all readers a very Happy New Year. Go well.

See you in 2021!

EDIT: 31st January 2021

Some photos below of the concept in action from a recent game of mine. They illustrate how I currently use my rules to 'play through' built up areas. BUAs have their own specific rules, but you can see how buildings and other scenery are shuffled about to accommodate the figures, whilst units aren't artificially constrained by the limits of the BUA - some of the unit can be inside, some outside.


A belated Happy New Year to everyone!

Wednesday 2 December 2020

Some 'Honours of War' Action

Now then. I will be the first to admit that my last post wasn't the most exciting I have ever written. Unfortunately, my actual gaming exploits have been very limited of late. However, over on the Honours of War website some rather more dedicated gamers have been developing and playing out a number of excellent scenarios, which deserve a wider audience. 

Furthermore, here in the UK, today is the first day of an easing in our lockdown, and it will be possible for some face to face gaming to re-commence (depending on which tier you're in). So perhaps a bit of inspiration wouldn't go amiss. Therefore, here are links to two particularly good recent scenarios which I heartily recommend.

Now there's an original title for an 18th century wargaming scenario. This is a clever and interesting gaming idea for any Horse and Musket wargamer, and the colourful map below should certainly whet the appetite. Follow the link above for a full explanation.


Enthusiasts for the War of the Austrian Succession have long been using HoW for this conflict, and with considerable success. As you can see from the map and the many accompanying photos posted on the forum, this is a big battle game featuring lots of figures on an impressive table. It all looks tremendous fun, and should provide inspiration for any Horse and Musket gamer.


Both of these posts contain all the detail you need to re-create the featured battles. It's great to have such top-quality input continuing to appear on the HoW site, and I want to thank both of the gamers concerned for their enthusiasm and for their spirit of sharing with other wargamers.

The Medetian Wars
To my shame, I have completely missed this excellent blog until now, and so as a belated tribute I wanted to draw your attention to this lovely looking game from 2017. It certainly inspired me. I have added the blog to my blog list and will be checking it regularly. As well as the games, it was wonderful to see some wonderful RSM SYW figures painted to a much higher standard than I ever managed, and beautifully photographed.

Enjoy!

Thursday 26 November 2020

Ruined Houses And Train Tracks

With my interest in the hobby revived, there naturally followed the urge to buy some more stuff. So here are a couple of things I convinced myself I had to have.

Battlefield In A Box - Ruined Buildings


I'm currently using Battlegroup as my WW2 rules of choice, which use a 1:1 scale - an individual model soldier represents an individual soldier. So built-up-areas can't really be generic - each house is individual, and a strict awareness of who is in what house is required. Hence the attraction of ruined buildings - they can be deemed to provide the same cover as a full building, but you can easily see what's inside.

Not being a scratch-builder, or even much taken by painting-up ready made houses these days, the above product from Gale Force 9 seemed ideal. I saved a few quid by ordering from Firestorm Games rather than the Flames of War website - the cost was about £36. In brief, I was entirely satisfied with the purchase. The actual models are just as good as they look on the box, being well cast and very well painted. The ruined roofs are detachable for even easier access.

The photos below show the buildings with some 15mm Polish troops - these buildings are of course in of 15mm size, or 1/100th scale if you prefer. To conclude - 'I heartily endorse this product'.


Whilst on the subject of ruined buildings, I wanted to show off another such which I painted myself during lockdown. This effort was a long time coming - see the last part of this post from 2017 for the original purchase. I kept looking at the model and deciding it looked too fiddly to paint, what with all that rubble. But 3 months of furlough was finally sufficient for the effort to be made. Actually, I'm quite pleased with the result and this ruined factory should sit well with the ruined buildings I've just bought. As you can see, the 'yard' area is separate, and a floor can be lifted to access the interior.


Train Track
A bit of a niche purchase here (even in a niche hobby like ours), but moving house involved me in throwing out the old bits of track I had bought for my Polish armoured train. The train is the old Peter Pig model, designed for the Russian Civil War and (I believe) no longer in production. When I acquired it in 2008 there was no Flames of War armoured train, although subsequently I added the FoW assault car to the loco and artillery cars I already had. 

I also, of course, had to find some track (no FoW train track either, back in the day), and I discovered I needed what is called TT scale stuff, with a 12mm 'gauge' - that is, 12mm between the rails. I went for some lengths of 'flexible' track, which worked pretty well as it could be bent round to accommodate different wargaming layouts. But years of bending took their toll and it started to fall apart. Hence its disposal when we moved house.

TT scale is also a fairly niche thing in the world of model railways, but I tracked down what I needed from the Kernow Model Rail Centre. This time I bought some straights and curves. So now I have some shiny new track for the train to run on. Cost was slightly less than the FoW product, though the points (if I ever get around to buying some) are more expensive. FoW do a rather tempting expansion pack, but in the end I thought the railway modellers' stuff would fit my needs better.


Frustation
Well, that's about it for now. Very frustrating not to be able to organise some games with my various gaming buddies (especially when I need to do some playtesting with Shadow of the Eagles), but we must be patient and hope for the best.

Go well everyone. 'Til next time!

Friday 6 November 2020

The Battle of The Simbach Bridge.

Well, the usual apologies are appropriate for the rather long gap between this and the last proper wargaming post on this blog. I have to admit the wargaming flame has been burning rather low the last couple of months, and the excuse is the common one - the intrusion of what we like to call 'real life'. In my case, this mostly consisted of the negotiations that led to me retiring in late September, and the consequent downsizing to a new house. 

Let me reassure readers that wargaming in our new smaller residence can continue - my usual 6' x 5' table will fit well in the dining room, although anything bigger might be a problem. And I have a 'study' that's a bit bigger than my previous 'enhanced cupboard'. I may even be able to have an armchair in there when the appropriate rearrangements have been concluded. Then, world beware!

But enough of domestic matters. As November came around, I awoke from my lethargy and started to take my hobby seriously again. And top priority was a Napoleonic game to playtest the latest updates to Shadow of the Eagles. Once again my old buddy Roy was willing to help out, with table space at his home and his wonderful Hinton Hunt armies. I sketched out a quick scenario, including the map as below, but left Roy to choose the armies and year of the game. I was wonderfully surprised and pleased to see, on my arrival, that he had chosen Austria vs. Bavaria in 1809, an original and fascinating choice. Napoleonics without the French? Who'd have thought it possible!


The Bavarians are defending the bridge over the Simbach, seen at the top left-hand corner of the sketch map. They have sixteen units organised in 3 brigades of infantry and 2 of cavalry, one of the latter still arriving over the bridge at game start. The attacking Austrians start the game half-deployed, with their left wing hurrying across the table from right to left and their centre rather lagging behind as well. They have nineteen units in 4 brigades of infantry and 2 of cavalry. Artillery batteries are brigaded with the infantry and cavalry in both armies. 

Roy left me to set out the armies whilst tea was prepared, and it was a pleasure to handle the lovely old figures and set them out ready for battle. I could feel my gaming mojo strengthening by the minute. The results of my efforts are seen in the 3 photos below, which show the overall deployment and then the Bavarian and Austrian armies respectively. My apologies for the quality of the photos - they were taken in haste and a bit of camera-shake crept in.


I took the Austrians, and predictably struck for the potentially vulnerable corner of the Bavarian 'L', whilst the brigade of lancers leading the left wing headed west towards the bridge at full steam ahead. I was able to dislodge a prominent Bavarian infantry battalion with concentrated artillery fire and effect a break-in, as shown in the photo below. Thereafter the crowding in of Austrian battalions left my artillery blanked-off from their targets. So much for pre-game planning.


Equally predictably, the Austrian lancers were met head on by the Bavarian right-wing cavalry charging forward from the bridge. Unfortunately, these gentlemen turned out to be an allied French brigade of high quality light cavalry. However, my lancers did pretty well in the circumstances. After 3 moves of grappling, and the overthrow of one of the French regiments, one unit of lancers was well-placed to make a dash for the bridge and win the game. Unfortunately, in their weakened state, they found themselves forced to halt to re-organise, and a battalion of Bavarian infantry had time to peel off and head to the bridge themselves. The game ended before this contest could be decided. A stage in the cavalry battle is seen below. 


The two photos which follow show the game at its height. The Austrian break-in slowly developed into something like a break-through, with units being lost on both sides. Unfortunately for Roy, his powerful left wing cavalry brigade of 4 regiments of light dragoons were saddled with an 'inept' commander. Despite my kindly advice to avoid throwing 'ones', Roy stubbornly insisted on producing 3 such rolls which held the brigade back at crucial moments. I have to say my leading cuirassiers, in contrast, had an excellent game and so the 2 Austrian cavalry regiments on this flank were able to impede, and even slightly push back, the 4 Bavarian regiments opposed to them, helped by the river protecting their right flank. 

To their credit, Roy's cavalry did aggressively engage some of the Austrian infantry in this sector, and did very well until the Austrians remembered this wasn't the Seven Years War and they could form square, which helped them considerably.


And so a couple more photos to finish off this account. The number of routed Bavarian units slowly increased, and although the Austrians suffered too, after about 5 moves or so Roy was staring defeat in the face. Rather than prolong the agony until the required 50% of units were actually lost, he resigned in my favour. In the first photo below, the situation in the centre at end-of-game is shown, with the Austrians still striving valiantly to effect a breakthrough. The final photo shows Bavarian and Austrian infantry in close combat on the Austrian left. The Austrians are (as Roy had to tell me) a dark-coated Landwehr unit, which I was allowed to class as regular for this game.


The rules worked smoothly, so much so that I found I had made no notes on changes or improvements when the game was over. Just as importantly, we had both had a very enjoyable few hours with plenty of time for chat in between moves, without being distracted by intrusively over-complex or poorly explained rules.

My thanks to Roy for so generously hosting this game, and ending the experience by gifting me a book and lending me 3 others. This hobby really is, in the end, all about the people.

Best wishes to all in the coming lockdown. Go well, 'til the next time!

Thursday 24 September 2020

Cotswold Wargaming Day Cancelled

Just the briefest of posts to announce the demise of this year's Cotswold Wargaming Day, which was to be held on October 18th. Just another casualty of Covid 19 I'm afraid. 

I'm hoping to try again in Spring 2021. Let's hope things are looking up by then.

Wargaming has been on the back burner recently, due to a tough time at work and a house move. Normal service will be resumed shortly.

'Til next time!

Monday 27 July 2020

Partizan Press to publish 'Shadow of the Eagles'

Hi everyone, just a brief post with the news that Partizan Press have agreed to publish my Napoleonic wargaming rules, Shadow of the Eagles. I would like to thank Dave Ryan for the opportunity to have a second set of horse and musket rules out there with my name on them. I've no idea what the cover will look like, so don't take the picture below as any indication of appearance. But all posts need some eye candy.

Napoleon at Wagram, Horace Vernet
OR - "These rules are no good. I can see something better on the way."

There are two things I can assure everyone of. First, the rules will have the same level of online support post-publication as Honours of War. I will be setting up a permanent website that includes a forum. Secondly, the rules will be dedicated to Stuart Asquith, with thanks for his friendship and inspiration.

If you are interested in the Napoleonic period and haven't already joined the discussion/playtest group, I would like to encourage you to do so. Your comments and suggestions will  make the rules better.


I hope to see you over there. 

Tuesday 7 July 2020

Airfix Nostalgia Project - The Italian Job

This is the third and final post in this series, just to let readers see how I got on with the last model made, the Macchi MC.202 Folgore. That makes 7 fighters in all, from 6 nations.


The Folgore was just as much fun to make as all the others. The only problem was the old decals, which slid off the backing easily but then crinkled up badly when applied. I gave up and sourced some Italian decals from Print Scale, which were excellent.

This project started well before lockdown, but turned out to be an excellent way to pass the time and relax during my furlough. I honestly didn't expect to find the whole thing so satisfying. Great nostalgia and very absorbing.

Proper wargaming in the next post, I promise!

Sunday 28 June 2020

Little Wars TV

The majority of you will know how dull most wargaming videos that you find on the net really are. Some tedious 'unboxing' where someone removes a product from its packaging and tells you what's inside, or a monstrously uninformative 'rules review' that consists of flicking through the pages of a rulebook whilst filming yourself doing it. And don't start me on the game reports...

Well, there is an alternative for the sane and discerning. Many of you will already be aware of Little Wars TV, but for those of you who aren't, I would thoroughly recommend you take a look. I'm not going to tell you much here, just follow the links and see for yourselves. These guys produce wargaming content that's actually entertaining and worth watching.


The latter is where the real fun resides, but see also the rules reviews. Yes, video rules reviews that you can actually stay awake through. I recommend you check out the Gettysburg broadcast (Episode 201), which is a remarkable piece of work for a bunch of amateurs.

Greg Wagman (the eloquent and personable guy who fronts up a lot of the broadcasts) was the same chap that did the scenarios which inspired my recent Ostrolenka post. If you haven't encountered this bunch of gentlemen yet - enjoy.

I Told You So! - 16th August 2020
It was interesting to find Greg Wagman featured in Wargames Illustrated 392 (August 2020). Funnily enough, he had written an article about making good wargame video reports. In his final tip, 'Watch Some Examples', he writes "Despite the depressing preponderance of unwatchable video AARs online, there are a number of excellent examples out there...". Yep. There are some good ones, but most of 'em, well... 'unwatchable' is what the man said.

Sometimes these things need calling out, even if it is a bit rude.

Thursday 25 June 2020

Counter-Battery Fire

Just a quick post on a common wargaming practice, which was prompted by finding an old photo online.

It is a commonplace in Horse and Musket rules to treat deployed (i.e. unlimbered) artillery batteries as 'dispersed targets' or similar. Like light infantry, deployed batteries are assumed to be well spread out and therefore, in general terms, harder to hit. This fits in well with what you read in most books about Horse and Musket tactics - firing at enemy artillery batteries with your own artillery is supposed to be a waste of ammunition.

So far so good. The reading I have been doing recently around Napoleonic warfare (and I've been doing a lot), commonly supports this idea. Napoleon himself spoke against artillery carrying out counter-battery fire. Unfortunately for this theory, when one turns to reading battle accounts, it is quite common to find the artillery from one side being instructed to engage enemy artillery when the enemy fire is becoming a serious problem - or indeed for artillery units themselves to engage enemy batteries on their own initiative. It is also common to find that such fire succeeded, depending of course on various factors such as the competence of the opposing batteries, their relative numbers, and any advantages of position one or the other artillery grouping might have.

So, in my opinion, the concept and practice of gaining 'artillery superiority' during an engagement was definitely current in Napoleonic warfare, and other Horse and Musket periods. I wanted to reflect this in my rules - having a nice little ding-dong between opposing batteries would, it seemed to me, add a bit of spice to a game. So in Shadow of the Eagles there is no negative modifier for artillery (or anyone else) firing at deployed artillery.

My rationalisation was that, firstly, firing in my rules (as in most others these days) is considered to represent not just actual death and destruction, but the moral or disordering effect of incoming fire - the effects of fear, fatigue and stress. As artillerymen cannot conduct their tasks whilst taking advantage of local cover or lying down, we must take account of the suppressive effect of enemy artillery fire in addition to actual casualties being inflicted.

Secondly, I started to question just how 'dispersed' an unlimbered artillery battery might be. Apart from the guns and crews, there are ammunition wagons, limbers, numerous men servicing those limbers and wagons, and of course lots (and lots) of horses. And so on this second point we finally get to the photo I mentioned at the outset. Below is a photo taken during the American Civil War of a 6 gun artillery battery and its supporting equipments deployed ready to fire:


Apologies, but that's about as big as it gets (as the Bishop said to the actress). But consider - does that really look like a 'dispersed target' to you? OK, maybe this was a parade of some sort (it is extremely unlikely to be a combat photograph), and those guns may be at less than normal deployment distance. But consider the depth of the target as well as its width. 

So I think the image makes a point. There are a surprising number of similar ACW photos online - I include a few below. The first might be another view of the same battery already shown above:


Of course, some of those photos very definitely feature artillery that was on parade. But I think there is food for thought here - and I am inclined to think the approach in my rules is correct - or at the very least justifiable.

Let me know what you think. 

Tuesday 23 June 2020

The Battle of Ostrolenka, 16th February 1807

With the lockdown situation still preventing face-to-face wargaming, I decided it was time for a solo Shadow of the Eagles playtest. I wanted a full-blown battle, and something a bit more interesting than lining up equal opposing armies on opposite baselines.

Deciding a nice Napoleonic scenario was needed, I came up with the idea of searching Google for 'Napoleonic scenarios'. Pretty clever, eh? And what should come up but exactly what I wanted, a blog called 'Free Napoleonic Scenarios'. My thanks to Greg Wagman, who created the site, for putting in the work in the first place and making it available online, and also for allowing me to reproduce the scenario map, shown below:

© Greg Wagman

The scenario I chose is based on The Battle of Ostrolenka, which took place in the aftermath of the famous Battle of Eylau. Greg admits in the background to the scenario that it has been massaged a bit to make for a better game - which is entirely sensible. I did my own bits of massaging, mostly as the online scenario is for Age of Eagles, a set of rules which allow for multi-division battles. For my own rules, divisions would have to become brigades unless I wanted to have a very large table (which I didn't) and lots of players (which I didn't have).

Add to this mix the fact that SYW figures would stand in for Napoleonic French and Russians, and this becomes very much 'A Battle Based On Ostrolenka But Only A Bit Like It'. Nevertheless, the scenario (as you will see) makes for an interesting clash which would test out my rules nicely.

The Forces
French, General Savary. Orders - 'Seek out and destroy the local Russian forces'.

1. On table at start, deployed around Ostrolenka - Rielle's Brigade.
Infantry Brigade - 2 Infantry Battalions, 1 Field Battery.
                              Independent Hussar regiment.

2. Arriving turn 2, point A - Savary's Division.
Gazan's Infantry Brigade - 2 Infantry Battalions
Becker's Cavalry Brigade - 2 Dragoon Regiments

3. Arriving turn 5, point C - Suchet's Brigade.
Infantry Brigade - 1 Grenadier Battalion, 2 Infantry Battalions, 1 Field Battery.

Total, 12 units.

Russian, General Essen. Orders - 'Capture Ostrolenka and drive the French from the field'.

1. On table at start, deployed north of the 'sandy hills' - Essen's Division.
Orlov's Infantry Brigade - 2 Infantry Battalions, 1 Field Battery
Penza's Infantry Brigade - 2 Infantry Battalions
Independent Dragoon Regiment

2. Arriving turn 3, point B - Volkonski's Brigade.
Cavalry Brigade - 2 Hussar Regiments, 1 Field Battery.
Independent Jaeger Battalion

3. Arriving turn 5, point B, Sedmarkatzki's Division.
Korolev's Cavalry Brigade - 1 Dragoon Regiment, 2 Hussar Regiments
Bikov's Infantry Brigade - 2 Infantry Battalions

Total, 15 units.

For the appropriate Russian flavour, one of Sedmarkatzki's Hussar regiments should be Cossacks - but I decided to just use Hussars as I didn't have suitable figures.

The Game

The battlefield from the south-east, with Ostrolenka top left,
 and the starting units of both sides in position.
The French emerge from Ostrolenka, but find themselves a little over-faced as the
Russians come into view attacking over the 'sandy hills'.
The Russian left wing infantry form into columns, whilst the Russian Dragoons charge the French right flank.
The French right wing infantry unit promptly forms square, and the Dragoons fall back with heavy casualties.
Here we see Savary's division has arrived (left), and Volkonski's cavalry with its supports to the right.
The French Dragoons move though the woods to hold off the Russians whilst the French infantry hurry on to Ostrolenka.
North of Ostrolenka a stalemate has broken out. The Russians are more numerous but the French are of higher quality,
and are receiving excellent artillery support from the hill across the stream behind their right flank.
Suchet's brigade is arriving behind them from point C - Ostrolenka seems secure.
The French Dragoons are outnumbered with the arrival of Sedmarkatzki's forces from point B, but they delay the Russian cavalry long enough for Gazan's infantry to form up east of Ostrolenka and divert Sedmarkatzki's infantry.
After about 10 turns (I wasn't counting), it is clear the French hold on Ostrolenka is secure. The Russians have failed to achieve their objective, but the French have been forced onto the defensive and the Russian forces are largely intact.

An indecisive game, with casualties on both sides light. It was interesting to see that when both sides deploy skirmish screens, a drawn out infantry firefight can result (as occurred north of Ostrolenka). Historical, but a bit dull! I called the game a draw, but it had been a most useful playtest.

I thought the scenario itself was excellent, providing plenty of manoeuvre and requiring constant decisions from both sides. It would certainly play much better with 2 or more players, rather than my enforced solo try-out. Thanks again Gregg.

'Til next time!

Wednesday 10 June 2020

Airfix Nostalgia Project - Part 2

WARNING: This post contains no information or photos relevant to Airfix kits.

Well, that's got the disclaimer out of the way. Despite the absence of Airfix kits in this post, I thought I would include an update on the closing stages of this enjoyable project. Part 1 of the posts regarding this project ended with a photo of my unmade Revell kit of a Vought Corsair. I am happy to report that this model is now made and the original 5 models are now finished. 


I'm afraid the Light Tank Mk.VI that I mentioned has been binned - making it was fun, but then I got to all the fiddly transfers and kind of gave up. The vehicle wasn't really part of the project and I didn't want another model needing to be dusted and taking up shelf space.

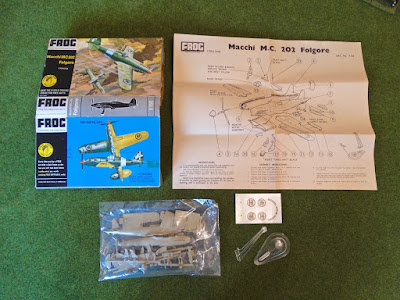
There has, however, been a further significant development. Some of you may have noticed the comment on the previous Airfix post from Steve-The-Wargamer, in which the absence of an Italian WW2 fighter was pointed out. This made good sense to me, and I have been investigating the Airfix G.50bis model, especially one in 'bagged' form. Unfortunately these seem to be about £25-30, mostly on ebay, and I felt I couldn't justify this at a time when my wife and I are trying to save money following my furloughing from work. But then, what did I come across online but a model of a much better Italian fighter - the Macchi C.202 Folgore.

Even better, this was a 1970s boxed kit from FROG. Ah, FROG - that name got my nostalgia meter swinging towards the red. Cost? Fifteen quid including postage from the fine people at Kingkit. It seemed an excellent way to finish up the project - I had pretty good memories of making the old FROG kits, as they often tackled the more esoteric aircraft subjects. I still fondly remember making their 'Gloster Whittle' kit, which lingered in my collection long after many others had been disposed of.

So the order went off, and as soon as I received it and opened the parcel I was very glad I'd made the investment. Here was more nostalgia, in spades. Anyone remember that the old FROG boxes opened out into a 'working tray'? I kept my modelling stuff in one for years when I was a lad.


What impressed me in particular was the high quality of the model itself - lovely moulding, no flash, good fit of parts. Good service as usual from Kingkit - I recommend these guys if you yourself fancy a bit of plastic kit nostalgia. A nice website, reasonable prices and every kit checked for completeness.

Can't wait to get started!

Thursday 14 May 2020

Free SYW Rules: Post of Honour v.9

Hi everyone. First of all, I hope you are coping with the Covid 19 crisis and finding some good amongst the bad. I am in a very fortunate position myself, and end up feeling rather guilty when I reflect on how tough these times are for some people.

This is just a brief post to flag up the availability of the latest version of Post of Honour. If you haven't encountered them before, they are not meant to replace Honours of War, but are my attempt to produce something a little simpler as an alternative. The rules are also suitable for the War of the Austrian Succession.

Die Schlacht von Leuthen (detail), Carl Rochling.

They can be dowloaded for free directly from these links:


Update 16th May - the downloads are now available in PDF format.

I hope you find the rules of interest. If you visit the Honours of War website, you can find a discussion board dedicated to PoH.

And finally, a reminder to Napoleonic wargamers that the Napoleonic version of PoH, which I have called Shadow of the Eagles, is available at the 'Eagles Shadow' discussion group:


Good luck everyone! 'Til next time.