I've been concentrating quite heavily on the SYW for the last few months, what with the new rules in development, so I decided it was time to take a break and try some WW2 to refresh my mind.
Looking for a scenario, my purchase at the recent WMMS show of Jumping Into Hell by Frank Kurowski (about the German Fallschirmjaeger in WW2) reminded me it was time I used those gliders I bought a while back. A quote from early in the book concerning a cancelled operation during the Polish campaign gave me all the inspiration I needed,
Generalmajor Student had wargamed a number of employment possibilities for his small number of paratroops. One of them was to be employed at the bridge over the Vistula at Pulawy. The paratroopers would jump into the area around the bridge, eliminate its security, remove the charges and hold open the route for the advancing armoured forces.
The soldiers of the battalion were already sitting in their transports when the operation was called off. Cursing, they got off the aircraft. It was later found out that the German armoured forces had already taken the bridge in a coup de main. (p.16)
Well, who'd have thought it? General Student a fellow wargamer! Anyway, looking in my copy of Case White, by William Russ, which gives a detailed breakdown of German operations day by day, the nearest I got to any extra clues about the operation was the map shown below. As you can see, there is no indication of tank units crossing the Vistula at Pulawy, which seems to have been taken by the 13th Infantry Division. So where the idea of an armoured coup de main came from I don't know. I found no further clues after the usual trawl of the internet, so I had to go with the scanty details I had. To make a good game, I picked the nearest armoured formation on the map that didn't have Czech tanks (2nd Light Division) as the unit racing for the bridge, which was to be captured in advance by a battalion of Fallschirmjaeger. Alright, not the most original airborne forces scenario, but reading Kurowski's book showed it was a surprisingly common mission in real life, though the number of cancellations was high. Rather like the Allies at the other end of the war.

Scenario - Operation Pulawy, 10th September 1939.
A bridge across the Vistula near the town of Pulawy, south east of Warsaw, has become a vital objective. Retreating Polish forces west of the Vistula are aiming for it as an escape route, whilst German mobile forces seek to cut them off by taking Pulawy themselves. A battalion of German paratroops has been detailed to capture the bridge and hold it, preventing its use by the Poles until friendly armoured forces arrive to relieve them. The map below shows the table setup (6' x 5'). The terrain is fairly flat, with just some low bluffs near the river, but quite heavily wooded.
 |
| A reinforced Polish company is deployed in each of the 2 indicated areas. A German glider company arrives at the LZ on move 1 to start the game, then on move 2 the paras drop on the DZ, provided they make their command roll for mobile deployment. Then on move 5 the Panzers should arrive at A and the final Polish company at B. |
 |
| The present day crossings of the Vistula at Pulawy |
 |
| Closer shot of the older road crossing. Built in the mid 1930s, this bridge was destroyed in the war but rebuilt post war. |
Polish Forces
Infantry Battalion, 39th
Infantry Division (Regular)
At Pulawy
Infantry Company: HQ CV8, 3
infantry units, 3 mg units (2 in bridge pillboxes), 1 40mm AA unit.
At Road Junction
Infantry Company: HQ CV8, 3
infantry units, 1 mg unit, 1 37mm ATG.
Artillery Battalion: FAO CV6,
2 75mm artillery units (off table)
Reinforcements. Arrive move 5 at 'B', mobile
deployment.
Infantry Company: CO CV8, 3 infantry
units, 1 mg unit, 1 37mm ATG (all in trucks).
17 units, BP = 9
German Forces
II/FJR.1 (Elite)
Glider Company, arrive move 1: HQ CV9, 3 infantry units, 1 engineer unit, 4 gliders.
2 Parachute Companies, arrive move 2, mobile deployment.
CO CV10, 6 infantry units, 2 mg units, 2 engineer units, 6 Ju52s.
CO CV10, 6 infantry units, 2 mg units, 2 engineer units, 6 Ju52s.
Elements of 2nd
Light Division (Regular). Arrive move 5 at 'A', mobile
deployment.
Panzer Battalion: CO CV9 4 PzI, 4 PzII.
Recce Company: HQ CV9, 1
Sdkfz 221 (recce), 1 Sdkfz 222 (recce), 2 infantry units (m/c), 1 mg unit
(truck).
FAC: CV 7, 2 HS-123 units, 2
assets.
27 units, BP = 14
The Game
 |
| The gliders land north east of the bridge. One glider veers away from the Polish AA fire and is placed on the table edge. |
 |
| On move 2 the paras suffer a disastrous drop due to an epidemic of 1s, and most are placed on the table edge north of their DZ. Here they make their way back over the wooded hill towards the bridge. The sole platoon that landed on target has already been destroyed by Polish fire. |
 |
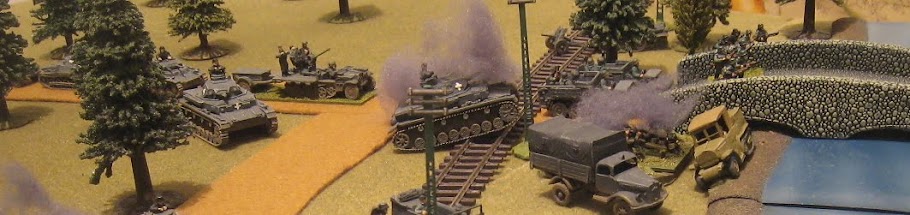
| The paras struggle forward, but take heavy fire from the bridge area and from the road junction and farm area on their right flank. |
 |
| The cavalry arrive on time on move 5. The recce company moves round through the haystacks to outflank the Polish position to the north. |
 |
| The Polish reinforcements are delayed by failed command rolls for a couple of moves, but then advance straight onto the bridge. |
 |
| The German armoured troops allow themselves to get bogged down confronting the Polish blocking position. An all-out advance to the bridge, bypassing the defended area, would have been more profitable. |
 |
| HS-123 prepares to attack the Polish-held farm area. |
 |
| End of the game. It was 2300 and bedtime, after 8 moves had been completed. The Germans had lost 12 units, the Poles none (yes, none). The paras and glider troops had been annihilated and the advancing panzers were stuck at the junction, whilst the Polish reinforcements had arrived and secured the bridge. So make that a German failure! |
Overall, the Germans (me) ended up with a fiasco on their hands. The airborne troops cocked up their landing (oh that stream of ones! Unbelievable!), and then were shot to pieces. The reinforcements needed to race for the bridge at all costs, but I got fixated on the Polish blocking position.
In my defence, I think the Polish forces at the bridge were a bit too strong. The heavy fire of 3 machine guns and the Bofors, plus extra flanking fire from the farm area, gave the German paras little chance. This was exacerbated by our use of the 'static hits' rule, meaning no hits came off at the end of the turn. A more sensible bridge force would be a company of 3 infantry units and an mg unit, reinforced by an AAmg unit.
Airborne Deployment
BKC II is a little lacking on rules for airborne deployment, and as in my Airfield Attack game I developed my own. In fact the ones used in this game were a little flaky, so I have now updated them. This is the current version, for early-war Fallschirmjaeger:
Fallschirmjaeger Deployment
Formations arriving by parachute
or glider use mobile deployment in their command phase but may be deemed to arrive on schedule if
preferred. They always count as attackers. Two units per Ju-52, one unit per DFS-230.
Parachute troops. Mark the intended drop point before game start.
Carry out AA fire against transport aircraft using the drop point as the aiming
point. Units in aborted aircraft are placed on the nearest table edge; units in
destroyed aircraft are destroyed. For each remaining unit (including command
units), roll 3D6 and a direction dice and place the unit this distance and
direction from the drop point. Then roll a D6 per unit. On a 1, 2 or 3 the unit
has not recovered its weapons containers and for the first move has no ranged
attacks. It will close assault with 3 attacks only.
Glider troops. Mark the landing point and carry out AA fire against
gliders as for transport aircraft. For unit deviation use only 2D6.
Terrain. Any glider or parachute units landing in high area terrain
take 6 attacks as if in the open. If landing in deep wet terrain or impassable
terrain they are destroyed.
Command bonus. As normal, 2 actions are allowed.
Command blunder. If a blunder occurs, roll a D6.
1, 2 – roll one die for each
unit. A score of 6 indicates the unit is knocked out. No saves allowed.
3, 4 – land this turn, but move
the drop point or landing point using 3D6 and a direction die.
5, 6 – move drop point as above,
but land on the displaced point next turn.
And that, as they say, is that. Good to get the WW2 toys out again, and congratulations to Paul on his victory (the bugger). See you soon.


