Followers

Tuesday 28 December 2010

The New Wargaming


I'm very happy to say I have finally managed to get an article into one of the wargames glossies: and not just any old glossy, but the best of them. Battlegames 24 has my article entitled 'The New Wargaming'. According to the blurb, 'veteran wargamer Keith Flint takes a long hard look at the commercial tendencies in modern wargaming and asks us to think hard about how we respond to marketing messages'. How about that: I'm officially a veteran wargamer! 

The article was inspired by reading comments on a number of forums over the last year, and by recent publications that have interested me like Wargames Illustrated and Black Powder. It occurred to me I was not particularly happy about some of the more commercial developments in current wargaming, which others seemed to welcome with open arms, so I decided to write a 'think piece' expressing my thoughts. Thanks to editor Henry Hyde for publishing it. 

Whilst the commercial growth of wargaming suppliers has provided us with a better level of choice and quality in wargaming products than we have ever enjoyed, some tendencies seem to me to be getting a bit out of hand, whilst others are being forgotten. For example, I'm afraid everything is getting a little too glossy and upmarket for my taste (and therefore increasingly expensive), whilst concepts like the pleasure of sharing things for free, or doing your own research instead of relying on supplements and army lists, seem to be fading into the background. Perhaps if one thing can be considered to have tipped me over the edge and into print, it was reading this comment regarding Black Powder on TMP:

First impressions: well, even if the rules are no good, the piccies by themselves will be worth the cost alone!'

If you agree with this sentiment, or in the unlikely event that its author ever reads this, I apologise in advance. But really! There we have a wargamer happy to shell out thirty quid for a few posed pictures of wargames figures, when they are available by the gross for free online. Alright, maybe the comment wasn't meant to be taken entirely literally. But it seemed to me some gamers were losing their perspective, not to mention their self respect and common sense, in becoming too enamoured with surface over substance.

I'm afraid the approach of Games Workshop and Flames of War to wargaming takes a bit of flak in the article as well. On the other hand, I applaud a project trying to take things the other way, namely Phil Olley's Classic Wargamer's Journal, which is not produced for profit and also contains no adverts.

Enough of me and my soapbox. I would say that Battlegames 24 is an excellent issue, with or without my article, being crammed with ideas and inspiration on a variety of topics. Indeed, it re-ignited my enthusiasm for this particular magazine after a few recent issues which I have found a little flat.

And finally, Happy New Year! See you in 2011.


Thursday 2 December 2010

Black Powder SYW Stats


For any Black Powderers out there (is there such a phrase?) who game the SYW, these are the stats I'm currently using, placed in the tables available from The Last Hussar's website (see my favourite links). Note I use First Fire to represent the better fire discipline of Prussian line infantry, and the hand to hand stats of the Austrian cavalry are all reduced by one as they appear to have been generally inferior to their Prussian counterparts. 

To discourage successful cavalry charges against line infantry (and successful charges in general) I am now using a modifier of +2 for closing fire. Cavalry do not get the +1 for charging frontally vs infantry unless the infantry they are charging are shaken, disordered or not supported.


Monday 22 November 2010

Down at the Club


Anyone remember the Drifters' hit? Maybe not. Anyway, I was down at Portbury Knights Wargaming Club last Friday and took a few photos of what was going on. Among the many good things about Portbury Knights (friendly club, well attended, lots of variety) is the fact that they open at 3.30pm on a Friday evening (the normal club night), and go on until 11.00pm. So if you can wangle that early stack from work, you have time for a relaxed big game, or two or three smaller games.

To be fair, this was a fairly quiet night. On some evenings the hall can be jam packed. And there was also a distinct WW2 flavour present, when usually there is greater variety. There were a couple of tables of gamers playing some kind of fantasy card games but I have rudely ignored them in the following photos - only historical miniatures here!

Your host for the evening is Alan Vowles, Club President. Yes, a bar is available in the hall. Beer and toy soldiers - the perfect Friday evening beckons.
Those Redcoats have moved from the bar counter to their more natural home on the wargames table. A Black Powder game set in the Sudan is in progress
Overview of the Sudan game. Black Powder is popular at the club  at present for Horse and Musket games.
My own first game was a Greeks vs Italians game set in 1941. I had the pleasure of using Steve Johnson's 10mm forces, and the Blitzkrieg Commander rules. Naturally, under my command the Greeks stopped the Italians in their tracks.
Steve is gracious in defeat as usual. Though his comment that he was 'playing in character' as the Italian commander was highly suspect.
Club stalwarts Stefan and Craig discuss Steve's charity moustache. A bit frightening but all in a good cause. Well done that man!
Stefan played this Western Desert game with his son. A distinctly 'old school' feel here, I felt. Nice!
Another view of Stefan's game.
Steve and I moved on to a game against Craig, using his 15mm figures and outstanding bocage terrain.  Germans vs Americans in 1944, using Blitzkrieg Commander again. Here we see German tanks in an outflanking move.
View from the American side.
Craig gathers the dice for another sickening set of saving rolls.
Towards the end of the game. German tanks doing well, infantry lagging. But in the end Steve and I were victorious.

A very relaxing seven hours which flew by in the company of some very nice people. Two games, plenty of discussion and conversation, plus beer and sandwiches. The perfect start to the weekend!

Monday 25 October 2010

More Free Downloads!


Following some recent playtesting, my SYW rules have reached a new iteration, which I hereby share with you on the same basis as before: the link will take you to a Mediafire page where you may safely download the rules.

Similarly, click on the link to the notes to get some background to the rules and a bit of explanation of where I am coming from.

Best wishes as always.


SYW Rules     SYW Rules: notes

Thursday 21 October 2010

Scenarios...getting it wrong


I had conducted a couple of playtests of my own SYW rules using the scenario 'Vanguards Collide' from the pilot issue of The Classic Wargamer's Journal. This is a great little scenario which was fun to play (even solo) and gave the rules a good workout. Looking for something a bit more ambitious for an evening game against a live opponent (well, fairly live: we're talking Paul James after a long day at work) I came up with 'The Battle of Pfaffendorf'. This would be a basic encounter game livened up by making an effort with the terrain, which would represent a river valley across which the armies would fight.


The map and deployment are shown above. Table was 6' x 4'. Forces were:

Prussia
1 - Grenadier infantry brigade: 3 grenadier battalions, 1 gun 
2 - Line infantry brigade: 3 infantry battalions, 2 guns
3 - Cavalry brigade: 2 dragoon regiments
4 - Hussar regiment (independent)
5 - Jager detachment (independent)
FK - Freikorps battalion (independent, in Pfaffendorf)

Austria
A - German infantry brigade: 2 infantry bns, 1 grenadier bn, 2 guns
B - Hungarian infantry brigade: 2 infantry bns, 1 grenadier bn, 1 gun
C - Light infantry brigade: 2 Grenz bns, 1 Bavarian infantry bn
D - Cavalry Brigade: 2 cuirassier regiments, 2 dragoon regiments

The three photos below show how the terrain came together: TSS tiles and hill contours were laid out, which were covered by two Games Workshop battle mats and then dressed with a FoW river and the usual bits and pieces. I decided to lay out the forces in full to save time deploying. My opponent would choose which side to play, or we would dice for sides if he had no preference.


I thought this all looked pretty good, for a quick evening game.


Prussian deployment.
Overall view and detail of the Line infantry brigade and its guns.
So far so good. But the weakness of the scenario was pretty obvious once we started playing. I had allowed for the river to be fordable within the woods and also for a section between the 2 streams, but it was still supposed to be a significant obstacle, taking a whole move to cross without being able to fire. Deployment was also pretty cramped, with little room for manoeuvre. The result, of course, was that a stalemate ensued with a firefight taking place across the water for the whole length of the river from the wooded table edge to Pfaffendorf. Neither side wanted to cross in the face of enemy fire.
At this point, the Prussians are getting the best of it,
having driven the Austrians back from the river bank.
I had hoped for some manoeuvre on the flanks, where I had given the Austrians an advantage in numbers. The Prussian left flank was, however, easily closed off by infantry units. Only on the Prussian right flank did some manoeuvring take place, when the weaker Prussian cavalry were predictably destroyed by the much stronger Austrian force, despite flanking fire from the Freikorps battalion. However, even here the flank was easily sealed off by a Prussian grenadier battalion (see below). In the end, both sides reached their breakpoint in the 5th move and the game was drawn.

The rules worked well and the battle played out as it might well have done in real life, but there was definitely some sparkle missing.

Consulting my copy of Scenarios For All Ages, by those kings of the scenario Grant and Asquith, I quickly found that where a river has to be attacked across in one of their games it costs a bit in movement but nothing else, and is usually fordable for its entire length. Pfaffendorf was inspired by the fictional Battle of Otterlitz in Volume 1 of the Classic Wargamer's Journal, but on closer inspection I found that the river valley in that battle (dating from 1957) was occupied only by a stream, which was easily fordable.

Ho-hum. The lessons are obvious. If almost the entire table is divided by a river, make it easy to cross. Or restrict your river to a small section of the table so forces can move around it. And if the table is filled by the opposing armies, give them the ability to get at each other and create gaps that can be exploited. Wargamers like manoeuvre: real battles may have often been a slogging match, but for our fictional wars we appreciate the dashing cavalry charge and the outflanking infantry advance.

However, all is not lost. I did like the look of my table when set out, so I will refight Pfaffendorf with the river removed and replaced by a road, and the town moved a little towards the centre to give the cavalry more room. We'll see how that goes.

See you soon!


Friday 15 October 2010

And for that classic look...


Always on the lookout for terrain items to enhance the table, I chanced upon these Javis walling sections at my local model shop. They only had a couple left so I decided to order a whole box online. Only £10.75, including p+p, for 9 sections, each 140mm long and 22mm high. And they come ready to use, flock and everything. They also come in their own box which you can use for storage. Very old school.

 
Specifically, these are OO gauge Garden Walling from the Javis 'Premier' range, code PW3. Javis only do online ordering for trade customers, but just type in the product name and you'll get 2 or 3 suppliers to choose from in the UK.
Here are the walls in action in a recent game, sheltering some Prussian jager.

And for that Classic read...

Have just received issue 1 of the Classic Wargamer's Journal, Phil Olley's new project. It really is just the thing for Old Schoolers, being a non profit making, basic magazine in an old fashioned, stapled together style, with no adverts. Just the antidote you need to Wargames Illustrated...

Only joking. I like WI as well. See Phil's 'Classic Wargaming' site if you're one of the remaining few who haven't heard of the project.

Best wishes 'til the next post.

Tuesday 28 September 2010

My Seven Years War Rules


My Featherstone-inspired Horse and Musket rules, now optimised for Austro-Prussian SYW battles, have continued to evolve. Rather than present them as a mega-long post, I have uploaded them to a file sharing site (as 'Horse and Musket Rules') so that you can download them as a PDF and see what you think. One major recent change is to move away from figure or base removal and just record casualties a la Black Powder. This keeps all your miniatures where they should be - on the table.

Anyway, I invite you to take the plunge, download the rules and see what you think. Need I add that comments are welcome? Surely not!

Download PDF

Airborne Armour - Now in Paperback!


Just a note to say that my book on the 6th Airborne Armoured Reconnaissance Regiment in WW2 is now available in paperback. The initial printing of 1000 in hardback has run out, but thanks to the miracle of digital publishing the paperback edition can be printed pretty much to order, so the book will remain available in brand new condition for a good while yet.

You'll find the cover is the same. A couple of minor printing errors have been corrected but be advised that there is no new content. However, the good news is that the RRP is a little less than the hardcover edition.

My thanks to Helion for keeping the book in print. Happy reading!

Monday 13 September 2010

Lobositz: It's A Town Of Two Halves


Not knowing exactly who would be able to turn up, I booked myself a table at Colours 2010 under the name of the North Bristol Wargames Collective. A daft name, but nobody seemed to mind. I did know what battle I was putting on: The Battle of Lobositz (1756), the first battle of the Seven Years War, between the Prussians under Frederick the Great and the Austrians.


I won't provide a potted history of the battle: good accounts are available at www.kronoskaf.com (follow the links) and The Wargames Room (NZ site - follow the links to Volley and Bayonet then 18th Century Battles). The map above is the Prussian General Staff map made in the 19th century. I was looking for a real battle to have a go at and Lobositz ticked all the boxes: an interesting encounter, relatively small armies, terrain do-able, etc.

When recreating an historical battle I like to keep things as historical as possible, so deployment would be as per the original battle and some scenario rules were enacted to keep things moving along historical lines (all based on using Black Powder of course). For example, the Lobosch hill was classed as rough ground, there were some special rules to limit charges and firing during the 3 moves at the start of the game when swirling fog was deemed to be present, and the Austrian left wing was limited to staying behind the Morellenbach for the first 3 moves. Frederick had to leave the battle after 5 moves in line with his behaviour on the day: the game was expected to last around 9 moves.

The historical forces were around 30,000 on each side. I found I could just about manage to represent them, on a ratio of roughly 1 model battalion to 3 actual battalions. My orders of battle were as follows:

Prussians

C-in-C: Frederick II, King of Prussia (SR10)
2nd-in-Command: Feldmarschall James Keith (SR9)

Left Wing Infantry (1st line): Generallieutenant Prinz von Bevern (SR9)
1 infantry battalion
1 grenadier battalion
1 jager detachment
1 medium gun battery

Left Wing Infantry (2nd line): Generallieutenant von Kleist (SR9)
2 infantry battalions
1 grenadier battalion

Right Wing Infantry: Generallieutenant Ferdinand (SR9)
2 infantry battalions
1 grenadier battalion
2 medium gun batteries

Cavalry: Feldmarschall Gessler (SR9)
2 cuirassier regiments
1 dragoon regiment

Cavalry: Generallieutenant Schwerin (SR9)
1 dragoon regiment
1 hussar regiment

Artillery on the Homolka Berg (under von Kleist)
1 heavy gun battery
1 medium gun battery

Austrians

C-in-C: Feldmarschall von Browne (SR9)

Left Wing Infantry: Generallieutenant Kollowrat (SR8)
3 infantry battalions
1 grenadier battalion
1 medium gun battery

Left Wing Cavalry: General Feldwachtmeister Lowenstein (SR8)
1 dragoon regiment

Centre and Right Wing Infantry: General Feldwachtmeister Lacy (SR8)
2 infantry battalions
1 grenadier battalion
2 medium gun batteries

Right Wing Cavalry: Feldmarschall Lieutenant Radicati (SR8)
(deployed in centre)
2 cuirassier regiments
1 dragoon regiment

Light Infantry Corps: General Feldwachtmeister Draskowitz (SR8)
2 grenz light infantry battalions

The Game

Four gamers turned up on the day: myself and my eldest son Sam (we would be the Prussians), along with Paul James and Andy Potts (both Austrian to the core). We had all run through a practice game on the previous Wednesday, which ironed out a few wrinkles and gave us all some food for thought on tactics. In particular we all resolved to be more cautious on the day, rather than risking a broken brigade or two at the end of the first move!


10.00am on Sunday and we're ready to go. We had a nice big table near the window with plenty of room to store all our stuff and keep the table clear of clutter. That's Sam, by the way. You'll have to smoke that roll-up outside, boy. I just hope it's ordinary tobacco.


A closer view of the set-up. Austrian left in the foreground behind the Morellenbach stream. Lobositz right background, Lobosch hill centre background. Polyester swirling fog in place. Sam adjusts the position of Schwerin on the Homolka Berg: the King of Prussia can be seen nearby on the same hill. We deployed the cavalry forward of the infantry on both sides, ready for the opening cavalry encounter as per the real battle.


Prussian deployment. In the foreground, Bevern's brigade faces the Grenz light infantry on the Lobosch.Ferdinand is deployed to Bevern's right, with von Kleist's line backing them up. Village in background (blue houses) is Wchinitz.


The Prussian cavalry peers through the mist, ready for the off. Initial cavalry moves were fairly cautious. Frederick is seen behind on the Homolka berg.


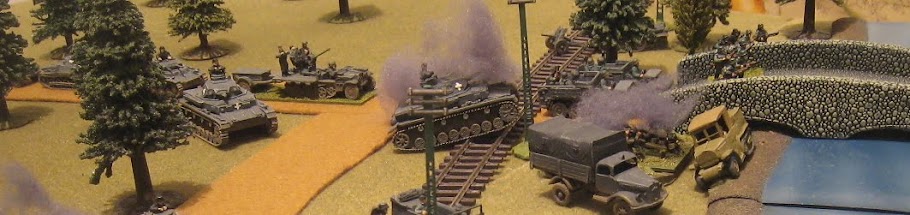
As the light infantry on the Austrian right were pushed back, one of Lacy's battalions fell back a short way to occupy Lobositz. Gun position on the right of picture would prove to be the Prussian's nemesis.


General view as the game got under way. Bevern makes good progress, but in the background two of Gessler's cavalry regiments have been forced back.


The Austrian players in action.


Prussian infantry continues to make steady progress in the centre and left. Frederick decided to personally lead a dragoon charge on move two to restore the cavalry situation in the centre, but miserable dice throws saw the unit and its King thrown back behind Wchinitz (bottom left). At least the Monarch survived!


Oh dear: those Prussian infantry are going to get a pounding from the Austrian guns.


The fog is about to clear. Bevern has taken the Lobosch Hill. A second Austrian battalion is moved back into Lobositz: the unit that moved back previously now occupies the rear block of the town.


Heavy pointing action in evidence around move 5. In front of Lobositz the Liccaner Grenz battalion make a 3 move stand against a battalion of Prussian infantry, badly holding up the Prussian attack. Damn them! The Austrian left wing is beginning to move across the bridge to support their centre.


After 3 moves of hand to hand the Liccaner regiment breaks. Andy is torn between pride and sadness as the grenzers return to their box. A touching moment indeed.


A couple of moves later. Having blasted away 3 Prussian infantry battalions, the blasted Austrian guns have been blasted in turn by Prussian artillery and have broken. A lack of understanding of the rules (and a lack of common sense) cost the Prussians dear: the Austrian guns should have been bombarded before the infantry went in, which would have saved a lot of casualties. On the plus side, close range infantry fire has broken the Austrian battalion in Lobositz. A nice little hole opens temporarily in the Austrian front.


Final move (move 8). The Austrian left wing infantry replaces the cavalry which move round in turn to plug the gap by Lobositz. Austrian grenadiers sally forth from Sullowitz in the foreground. Schwerin's Prussian cavalry are still active as well and manouevre towards Lobositz (centre left of picture). But time is up. By this time (16.30) we were about the only ones still actually playing on our floor.


Lobositz at the end of the game. The town was formed of two blocks (hence the title of this report), and one each is held by the Prussians and Austrians. The town is burning as a result of the Prussian bombardment (a scenario specific rule which aided the eviction of the Austrians). Though there was still some life left in the game, a Prussian victory seemed unlikely, so the day was awarded to the Austrians. History had been reversed.

All in all, a truly excellent day's gaming. The scenario worked well and both sides hopes were maintained until the end. Colours itself was as good as ever: a great selection of games and traders in a cracking venue.

Some very good friends of the NBWC were putting on a Spanish Civil War game on the floor above: see the Blitzkrieg Commander forum under 'Shows and Conventions' for a link to a report of their game.

Here's hoping we can think of something equally good for next year!

Monday 16 August 2010

Frederick Prepares For Battle


Suddenly it's that time again: Colours 2010 is just 3 weeks away. In the last few years this has become my main show of the year: it's not too far away, it's a good size, it's well organised and it has perhaps the best location for a wargames show outside Kelham Hall. The grandstand at Newbury Racecourse provides an open and modern venue, with great views across the course from the floor to ceiling windows.

This year I'm doing another demo game, but on this occasion it's SYW using the Black Powder rules. I'm attempting the Battle of Lobositz (the opening battle of the war), which I've decided is just possible despite my limited resources. More details about the wargames refight will be posted when I write up the game on this blog after the show.

I have to say straight away that my demo games are unlikely to win any prizes. They tend to be basic and use mostly those resources I already have. No months of constructing purpose-built terrain and assembling armies of hundreds of figures. I salute those who produce the jaw-dropping set-ups we all admire - but where do you get the time? And where do you get the sheer enthusiasm to see those projects through? I'm afraid I am sadly lacking in both.

Anyway, even I couldn't do Lobositz without representing Frederick himself. I decided to go for the Tradition figure of the King of Prussia, along with another mounted general from the range to keep him company. Some will know these as Stadden figures, after their original sculptor. They are painted to my usual basic, 'toy soldier' standard. Although advertised as 30mm, you can see they are well over that size and tower over my RSM hussar figures. But placed on their own command base they blend in well enough, and give due prominence to Frederick. After all, he was something of a towering personality! Cue tumbleweed.

The hussars were one of the few extra units I had time to paint especially for the game. They represent Hussar Regiment no.7, the 'Yellow Hussars'. The church was also bought for the game. This is another JR Miniatures building (like the others I use for this period), from their 15mm Prussia range. In contrast to Frederick, this building turned out be a little under scale, with doors more suited to 10mm figures. But once mixed in with the other buildings, it will form a nice addition to the town of Lobositz (or Lobosice, as it is called these days, being in the Czech Republic). Somehow, once the game is set-up and battle commences, one doesn't notice that Frederick would have to literally crawl through the doors on his stomach to get into the church!

I hope that some of those reading this blog will be able to attend the show (11th - 12th September). I will be there on the Sunday only, first floor. Come and say hello.

Friday 25 June 2010

Black Powder House Rules


One of my New Year's resolutions was to cut out the house rules as much as possible. The main catalyst was joining the Portbury Knights wargaming club. This is the first club I've formally joined and attended regularly, and it soon became apparent that everything was much easier if you just played it out of the book. Everyone knew where you were coming from. And I soon found that those treasured house rules didn't really make that much difference to outcomes anyway. So my house rules for Black Powder are nothing to get excited about. Remember I only play SYW so all the house rules relate to this period.

Distances
As I will generally be playing on smaller tables than those featured in the rules, I quickly decided to reduce all disances by one third. This is easily done as all the distances in the book divide logically. This includes all firing, movement, command, initiative and proximity distances, except for the following:

Artillery ranges stayed the same, including the 6" short range. Artillery in the original game has artillery range set rather short in relation to infantry fire. I wanted to redress the balance a bit. I also added 'heavy artillery' with a range of 60", to represent those Brummers and 24 pounders.

Sizes of 'shoot through' gaps are retained. I'm still using 28mm figures so gaps reduced by a third seemed a little narrow.

Commander movement is 30". All my commanders are mounted in this period and two thirds of 48" is 32". 30" is just a nice rounded figure and easy to remember.

Formations
Attack column and mixed formation are not used, as they didn't feature in the SYW as far as I know. Square can only be used when units are forced to retire and the rules state that forming square is an alternative move (p.97).

Broken Brigades
An amendment here as I will generally be using smaller brigades (2 to 4 units) and I wanted them to be a bit less fragile. Therefore, a brigade cannot be broken unless at least one unit from the brigade has been destroyed or has left the table. All other rules remain the same.

Buildings
Where a town or village is formed of 2 or 3 'blocks', units able to retire from one block to the next will not ignore a retire result from a break test. This is just a minor tweak to give attackers a reasonable chance of establishing a foothold in larger built up areas.

Unit sizes
My units as modelled for previous rule sets were smaller than those in the rulebook, and I had no wish to expand them, leading to a great deal more expense and painting. I like my 20 figure infantry units. Reduced unit sizes as compared to the rulebook also fitted in with the reduced move and firing distances. So my unit sizes are:
Infantry: small=8-12 figures, standard=16-20 figures, large=24-32 figures.
Cavalry: small=4-6 figures, standard=8-10 figures, large=12-16 figures.

Stats
Most of my unit stats are fairly standard, and I use as few 'special rules' as I can. Most line and grenadier infantry get 'first fire'. Grenadiers and cuirassiers get 'elite 4+'. Grenadiers usually get 'superbly drilled'. Grenz and Jagers get 'skirmish'. My heavy cavalry (i.e.cuirassiers) don't get the 'heavy cavalry' rule as I feel this makes them much more effective than is historically correct.
I prefer to make my grenadiers and cuirassiers a bit more stubborn by giving them a stamina of 4, and keeping a standard moral save of 4+. That way they take casualties at the normal rate but are just a bit tougher than normal troops.

Generally, I use a staff rating of 9 for the Prussians and 8 for the Austrians. And that's about it. I have found no need for any fundamental changes to how the rules work, such as altering the move sequence to 'I move, you fire, you move, I fire' as some have suggested. I just haven't found that the rules as written cause me any real problems.

Next Battle
I'm considering an adaption of the Gross Jagersdorf scenario available for download from the Edinburgh Wargamers site (on their Die Kriegskunst page). This offers a nice historical game on a 6' x 4' table, with forces I can more or less match. So stay tuned!


Tuesday 25 May 2010

Dawn at Witzenhausen


If you have the Black Powder rule book you'll be familiar with the ACW scenario 'Daybreak at Hangman's Creek'. I decided to have a go at this with my SYW forces, renaming it as befits the different period. Witzenhausen is the German town twinned with the town where I work. I just liked the name.

This is not a particularly big game so I had no trouble getting together about the same number of units per side as in the original scenario. However, a 12' x 6' table is rather too much to ask in my family home. I was able to squeeze an 8' x 6' table into the dining room by removing most of the furniture, and this would have to do. My infantry units would be mostly 20 figures rather than 36 which would make things easier. I also omitted the gun foundry and the outer arm of the river. The 2 photos below show the terrain I ended up with. Initial on-table troops are deployed and the Prussian commanders placed on their baseline ready for arrival throws.


The scenario was mostly as per the book. The Prussians would arrive on their baseline following successful command rolls for each brigade: any late arrivals could be put down to the problems of a night approach march. All the Austrian commanders started in the town, the camp was occupied by 1 Austrian brigade, and the other 2 were off table. 2 small light infantry units acted as the advance picket who could deploy anywhere on table as long as they were no closer than 12" to the Prussian baseline. One regiment from the Austrian cavalry were also allowed to start on table, guarding the bridge. As shown below, I substituted a cavalry brigade for one of the infantry brigades on each side, and arranged things so that the cavalry brigades would not start opposite each other. This would scupper the obvious option of a mutual charge, and hopefully make each commander think a bit more deeply about how to employ his cavalry.

Loss of the town or camp would count as a lost brigade for the Austrians.

Forces were:

Prussia (staff rating 9)

1st Brigade (centre)
2 line infantry battalions
2 grenadier battalions
1 jager detachment
2 guns

2nd Brigade (left)
3 line infantry battaliopns
1 grenadier battalion
2 guns

3rd Brigade (right)
2 cuirassier regiments
2 dragoon regiments

Austria (staff rating 8)

Picket (marauders)
2 small light infantry battalions

1st Brigade (camp)
3 line infantry battalions
1 gun

2nd Brigade (town)
2 line infantry battalions
2 grenadier battalions
1 gun

3rd Brigade (bridge)
2 cuirassier regiments
2 dragoon regiments

The Game

Hungarian and Bavarian battalions occupy the camp at the start of the game. Their absent commander may be imagined sleeping off a heavy night in an inn at the nearby town

Austrian commanders concentrated in the town.

Prussian deployment. All brigades managed to arrive on the 1st turn. Prussian forces are concentrated onto the right side of their baseline, to avoid the constriction of the river bend to their left. Austrian Grenz occupy the field and wood in front of them.

The Prussians manage a rapid advance in the first turn.

On the Prussian right the cavalry loop around the wood. They have a tempting expanse of open ground ahead.

The Grenzers do a good job of delaying the left flank Prussian brigade, but on the extreme right of the picture 2 battalions from the centre Prussian brigade are nearly at the town. Austrian cavalry enter the board at the top of the picture.

After a slow start, the Austrians start to arrive in force. Their cavalry come galloping over the bridge and find themselves in the midst of the Prussian advance. The Prussian infantry on the left just missed out on blocking the bridge ahead of them.

The action is now in full swing, concentrated around Witzenhausen and the camp. Austrian infantry have occupied one half of the town whilst a Prussian battalion has the other half. The Prussian guns have deployed to bombard the camp, but their own cavalry have foolishly blocked their line of fire.

The Prussian cavalry has reached the town but doesn't seem to know what to do next. The Austrian cuirassiers form themselves into line and go after some of the Prussian guns (they have just destroyed two).

Close up of the action in the town. It was formed from 2 'blocks'. Technically there can be only 1 battalion in each block, but an Austrian battalion has moved up the road in column through the Austrian held block and is attacking the Prussians in the next block. Temporarily there are 2 Austrian battalions in one block.

Close quarter tussle between the town and river.

Final positions. We managed 5 turns, but neither side had had a brigade broken.
Let's call it a draw!

Conclusion
An interesting game despite the lack of result. Units were all over the place, with battalions and regiments of both sides on each other's flanks and rear. This resulted in an excellent tryout for the rules.