
So, how far can a real battle be downsized to fit one's resources, and still be a worthwhile representation of the original? When I had a go at Lobositz at Colours 2010 (see older post) I ended up using a rough scale of a wargames battalion to represent 3 actual battalions. I thought the result still gave quite a good feel of the original action.
I have picked Hochkirch (14th October 1758) for my next effort. I found it particularly interesting as the Austrians not only attacked, but won as well, even with Frederick in charge of the Prussians. They also had a pretty interesting plan, manoeuvring around Frederick's camp and attacking it from 3 directions at once. Unfortunately, whilst the Prussian army was about the same size as at Lobositz (around 30,000) the Austrian army was more than twice as strong, around 80,000. To represent an army of 80,000 men I could, of course, paint a lot more Austrian units and use a much bigger table than the 8' x 6' which is the biggest I usually use. But I am only a small time wargamer with limited time and enthusiasm, so I decided I would take the obvious course: stick to an 8' x 6' table and increase the number of real units represented by each wargames unit.
My main sources for the refight were the account on the Kronoskaf SYW website and Frank Chandler's Volley and Bayonet scenario book, Battles of the Seven Years War. Of course the great thing these days is that a simple Google search will give you a number of results for 'Battle of Hochkirch', so I was able to see how a few other people had handled the action, most notably the 2009 post on James Roach's 'Olicanalads Games' blog. And for atmosphere you have to read Thomas Carlyle's account of the battle from his History of Friedrich II, which is also conveniently available online. After a good deal of poring over OOBs and maps, I came up with forces and a layout that fitted the table and models I had available.
The map of my layout is seen below, with the Prussian deployment marked. To fit the battle into the available space more easily, the battlefield was twisted slightly, so that north is offset as shown. In the end, 5 battalions of infantry and 3 regiments of cavalry, plus 2 small detachments of Jager, stood in for an army of 30,000 men, on a ratio of around 5-6 real units for each on-table unit. A bit modest, you might think, but I felt the overall shape and tactical feel of the battle would be retained. At this ratio, battalions become brigades and brigades become wings.
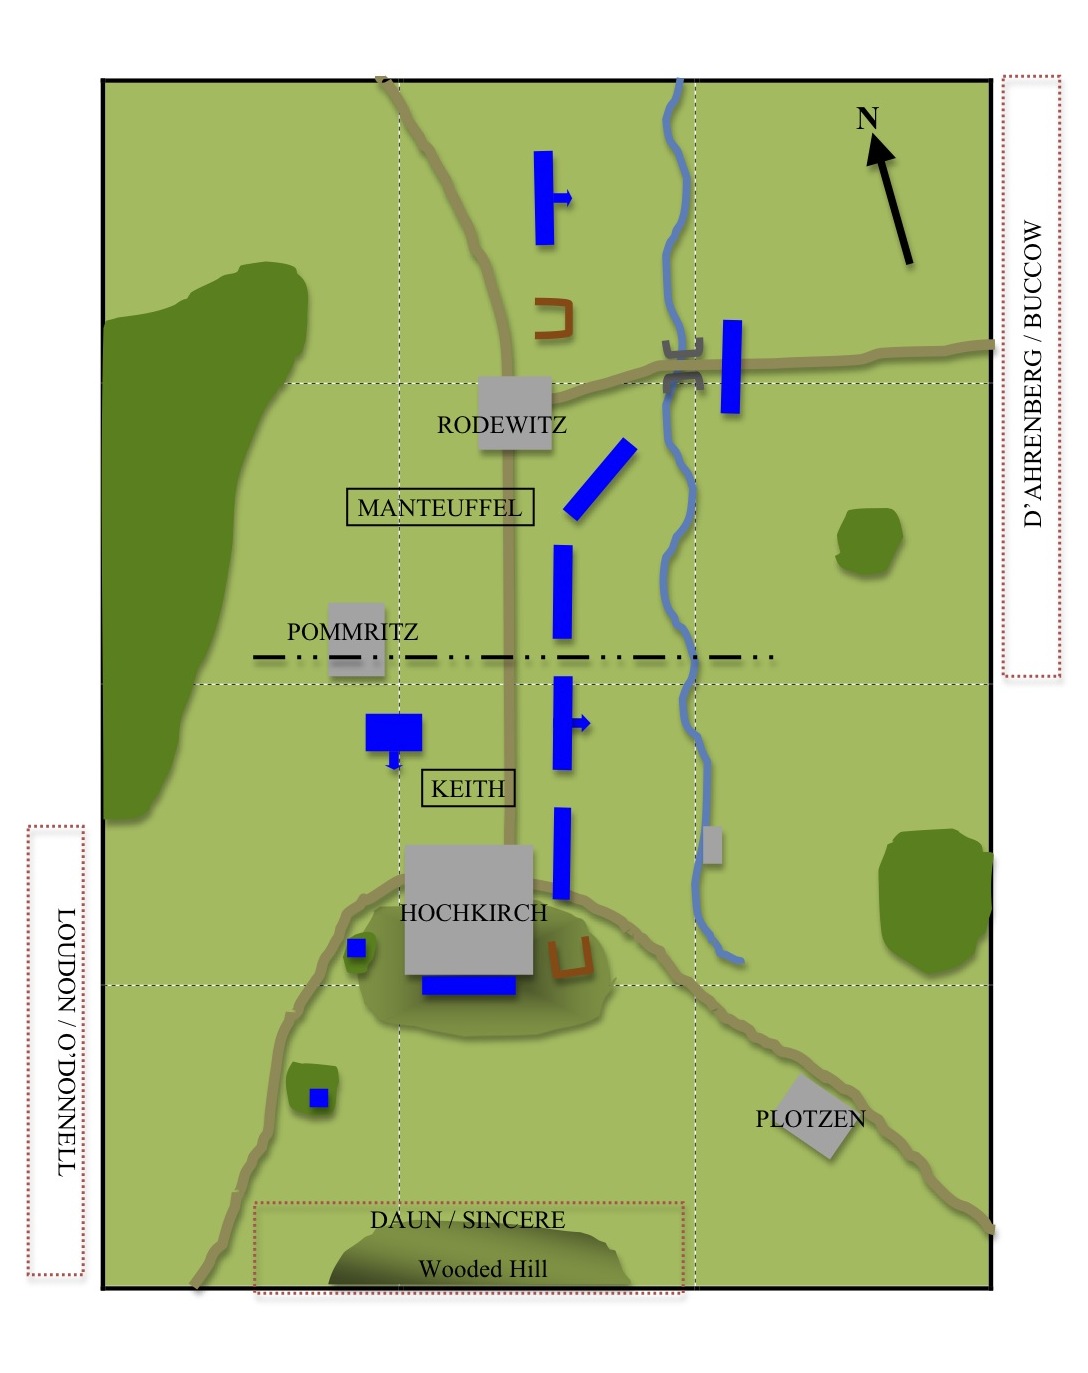
Terrain notes: the stream is a linear obstacle and counts as cover. Woods may be moved through at half pace by formed units or at full pace by light infantry. Hills can be moved on at full pace by all units. Both Prussian artillery batteries are in fieldworks, marked in brown. (Dark green areas are woods, the olive green shaded areas hills).
Of course, I had to make arbitrary decisions about the command structure on each side, bearing in mind I would be using Black Powder. The organisation I ended up with is below. As I have said, the 'wings' will count as Black Powder brigades.
Prussia
C-in-C: Frederick II (SR10)
Left Wing: Generallieutenant Manteuffell (SR9)
1 grenadier battalion
2 line infantry battalions
1 cuirassier regiment
1 medium battery
Right Wing: Feldmarschall James Keith (SR9)
1 Grenadier battalion
1 line infantry battalion
1 cuirassier regiment
1 dragoon regiment
2 jager detachments
1 medium battery
The division between the 2 wings at initial deployment is shown on the map by the dotted and dashed line through Pommritz. Cavalry units on the map have an arrow to their front. In line with the actual battle, Manteuffell's grenadiers should be the unit guarding the bridge in the north-east, whilst Keith's grenadiers should be the unit placed in front of Hochkirch itself. The two jager detachments are classed as 'tiny' for BP and represent the jager and freikorps units deployed to protect Frederick's right wing, south-west of Hochkirch. Frederick starts the battle within 8" of the centre of Rodewitz and must remain in the north half of the table for the first 3 moves, until he realises the attack to the south is serious.
Austria
C-in-C: Feldmarschall Leopold Daun (SR9)
Left Wing: Feldmarschall-Lieutenant Loudon (SR9)
assisted by General de Kavallerie O'Donnell (SR8)
1 line infantry battalion
1 grenz light infantry regiment
1 cuirassier regiment
1 hussar regiment
Centre: Feldzugmeister Sincere (SR8)
2 grenadier battalions
3 line infantry battalions
1 medium battery
1 heavy battery
Right Wing: Feldzugmeister D'Ahrenberg (SR7)
assisted by General de Kavallerie Buccow (SR7)
3 line infantry battalions
1 grenz light infantry battalion
1 cuirassier regiment
1 dragoon regiment
2 medium batteries
Daun is with Sincere commanding the centre. This represents the main body of the army, which will initiate the attack. They are deployed in the area shown at game start, up to 9" from their baseline. The Austrian left wing can arrive from move 3 along the stretch of baseline indicated, subject to a successful command roll. The right wing can arrive along their bit of baseline from move 5, also dependent on successful command rolls. The lower staff rating of the right wing generals is based on the slow movement of this wing in the real battle, which was affected by a Prussian flank threat from the north. These Prussian flanking forces (for students of the battle, those under Retzow) didn't actually get involved in the battle and are well off table, so are not represented.
The additional commanders listed for the Austrian left and right wings are an attempt to recreate the original command structure a little more closely. In both cases, the assistant commanders can only issue orders to cavalry units, whilst the main commanders can order any unit in their wings. O'Donnell's cavalry should deploy on the left of Loudon's wing, Buccow's cavalry on the right of D'Ahrenberg's wing.
Scenario Conditions
The battle commenced at 0500, ending with a general Prussian retreat at around 1000. My guess for game length would be 10 turns.
The initial attack on Frederick's right wing opened in darkness, fog and mist, so the following rules are in force for the first 4 moves (dawn at this time of the year in Germany is roughly between 0700 and 0730). During these initial moves there is an extra -1 command modifier for ordering units more than 8" from the command base (remember I reduce all rulebook distances by one third, so this equates to the normal 12" command distance). There is also a -1 extra fire modifier for any fire beyond 6" in the first 2 moves, and beyond 12" in moves 3 and 4. No charges may occur from a distance of greater than 6" in the first 2 moves, or 12" in moves 3 and 4.
Any artillery defeated in melee by the Austrians may be captured and used against its former owners (copying events in the real battle). This will require a successful order from the nearest command figure.
This is actually a fairly small battle in BP terms, so to keep it going I will be using amended brigade morale rules. Each wing/centre formation counts as a single brigade. Units only count as lost for formation morale when they are destroyed or have left the table and cannot return. Each army seeks to win the battle by breaking the opposing force. The Austrian army is broken when 2 of its 3 formations are broken. The Prussian army will only break when both its formations have broken.
Below are some photos I took when I made a practice set-up. The building on the near base edge of the top photo represented the village of Laske, but subsequently I decided to leave this village out and instead represent Plotzen (to the south-east of Hochkirch), along with the associated road. I placed all Austrian units on table merely to test the deployment areas.


Part 2 of this post will be the refight itself. I intend to take this battle to Colours 2011 in September, but of course would hope to playtest it well before then! I'll keep you, erm, posted.
Happy Easter!