
Time once again to take a break from the Seven Year's War and dabble with my 6mm Desert War collection, using Blitzkrieg Commander II as the rules.
As with most of my recent desert games I am taking inspiration from Frank Chadwick's book Benghazi Handicap, and the scenarios therein. This time I have chosen the first scenario given, the Battle of Qabr al Ahmar, which took place on August 5th 1940. Supposedly this was the first real tank battle of the desert campaign, and featured a number of the much derided M11/39 tanks on the Italian side:
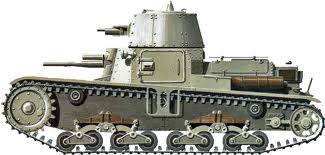

It is sad to relate that the GHQ M11/39 tank models I needed for this battle were bought at Colours 2010, and have languished in their blister packs ever since. How time flies! But one of the conveniences of this scale that you can assemble and paint, to a reasonable standard, 5 tanks from a pack in an hour or two. And so only very little effort was required to get the forces I needed ready.
Those of you who have the book might have noticed that the battle is called Gabr el Ahmar by Frank. There is almost nothing on this battle on the net or in any of my reference books, but one thing I think I have established is that it should be Qabr not Gabr, and al not el. Qabr translates as tomb (gabr doesn't translate as anything), so we can have a small building as the centrepiece of the terrain, really for decoration only. Here is the map from the book:

As usual, a 4' x 4' table is perfect for 6mm models, and the terrain is easily set up. Forces are also modest. These are the Brits from the book...

...which I have transposed for BKC into:
7th Armoured Brigade, plus Supports. CO, CV8
Initial Troops
8th Hussars (+). HQ CV8
1 A9
5 MkVIB
1 37mm portee
2 Rolls Royce armoured cars (recce)
Reinforcements
6th RTR. HQ CV8
3 A9
3 MkVIB
'A' Company, 1st Battalion KRRC. HQ CV8
3 infantry units in light trucks (veteran, ATR upgrade)
1 37mm ATG with tow
1 scout carrier (recce)
'F' Battery, 4th RHA (off table). FAO CV7
2 25pdr artillery units
BP = 9. 25% = 5
Reinforcements arrive move 3. May use flank deployment. CO arrives with reinforcements.
For the Italians the book gives...
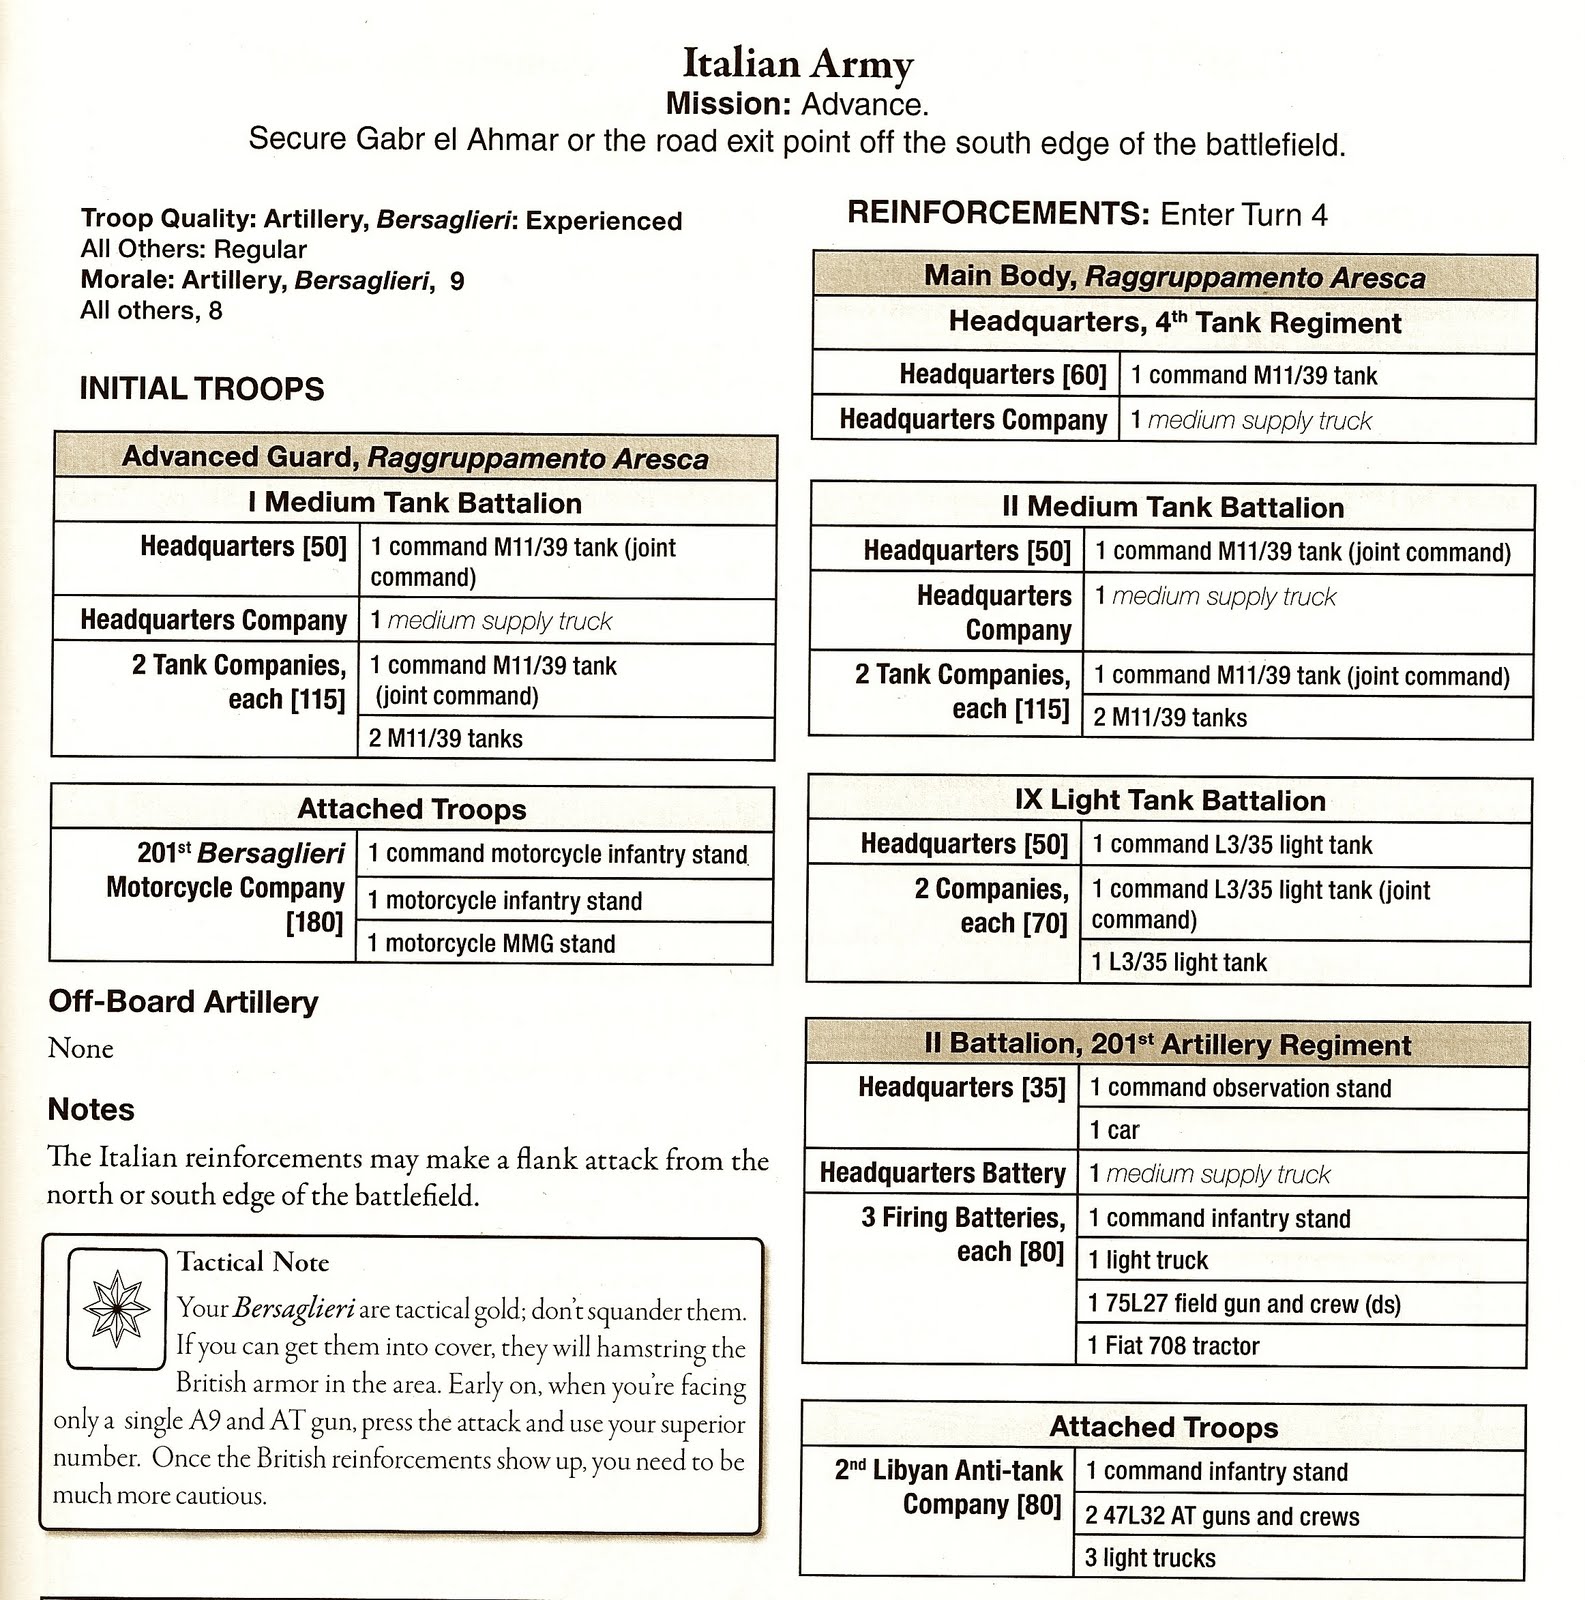
...which I transpose as:
Raggruppamento Aresca. CO CV8
Initial Troops
1st Medium Tank Battalion. HQ CV7
5 M11/39
Motorcycle company, 201st Bersaglieri. HQ CV7
2 m/c infantry units (regular)
1 m/c mg unit (regular)
Reinforcements
2nd Medium Tank Battalion (+). HQ CV7
5 M11/39
1 47mm ATG with tow
9th Light Tank Battalion (+). HQ CV7
5 L3/35
1 47mm ATG with tow
2nd Battalion, 201st Artillery Regiment (on table). HQ CV7
2 75mm artillery support units with tows (veteran)
BP = 11. 25% = 6
Reinforcements arrive turn 4. May use flank deployment. CO arrives with reinforcements.
Notes
I have separated the Italian initial forces into 2 commands, as I think it will be handy and fun to have the infantry available to go their own way. For the British initial forces, I have folded the Rolls Royces into 8th Hussars, reasoning they were supposed to act as a recce force for the tanks. This is obviously just personal choice.
2 pdrs will have to stand in for the 37mm ATGs of the Brits, as I don't have the correct models, but they will fight as 37mms, the stats being different. There are only 2 guns in the Italian artillery formation as I only have 2 suitable models, but I think this will be enough to represent their role. The Libyan-manned 47mm ATGs of the Italians have been added to the tank battalions.
The book states that reinforcements for both sides can enter 'from the north or south edge', which doesn't fit in with the map orientation (north being up, as usual). I have taken this as a misprint, having encountered something similar in one of the other scenarios, assuming it should read 'east or west edge'.
I have made my own assessments of troop quality, guided by Mr. Chadwick. The British infantry get veteran status. It is not normal with BKC to give veteran status to support units, but as the Italian gunners were famous for their resolve, they get the higher rating as well.
The game will be fought as a standard BKC encounter scenario, except that I have no idea whether the forces have equal points (and I don't intend to check!).
The Battle

Shallow wadis are represented by brown felt shapes: these are treated as high area terrain for movement purposes. Units in a shallow wadi can claim partial cover but do not get a save value. The rough ground (shown by the fine gravel seen in the bottom right hand corner) attracts the dense terrain modifier but offers no cover. Moving on Qabr al Ahmer also means a modifier for dense terrain.

The Italian 1st Medium Tank Battalion moved quickly to centre table, watching with bemusement the antics of the British initial forces (who suffered 2 command blunders in 4 moves)

Combat was limited until the arrival of the reinforcements. The Italians managed to get themselves sorted out into a reasonably balanced deployment.

The Italian 9th Light Tank Battalion have their moment of glory, cresting the rise of Qabr al Ahmar and machine gunning the KRRC company. They would soon be driven off by the British light tanks (see 'House Rules and Other Stuff' below).

Half the Italian artillery failed to arrive on table (another command blunder), but the half that did set themselves up on a rise to the east of the road and did some useful shelling.

The Italians didn't fancy flank deployment (with their low CVs), but 6th RTR managed a delayed flank deployment which brought them right under the barrels of the Italian 2nd Medium Tank Battalion.

A determined slugging match went on for several moves, which the Italians eventually lost.

Qabr al Ahmar was the focus of the fighting. The Italian 1st Tank Battalion suffered a command blunder which saw them recklessly charging forward into a hornet's nest of British fire, which was to lead to their destruction.

A cloud of smoke hangs over the battlefield as the game ends. British light tanks have also suffered, but victory was with the British who knocked out a large number of Italian units in the last couple of moves, taking the Italians well beyond their breakpoint whilst themselves only losing 6/9.
House Rules and Other Stuff
BKC2 doesn't give the British Vickers Light Tank MkVI an AT value, but the vehicle had a heavy machine gun (Vickers 0.50" or Besa 15mm) supplied with armour piercing rounds and designed for anti-armour fire. Hence I give these tanks 1/20 for their AT value, and they were able to drive the Italian L3/35s off Qabr al Ahmar during the game with no trouble.
The M11/39s fought nobly but in a firefight their limited traverse and AT value of 1/40 puts them at a real disadvantage. If anyone knows why their main armament gets only 1 attack rather than the 2 attacks of other 37mm/40mm weapons of this period, I would be glad to hear from you. For the moment I'll just go with the rules.
There is an interesting article by David Brown in the latest Battlegames (Issue 26) arguing that the Warmaster system makes command and control subject to rather too much luck. He makes a number of interesting points, and this battle might be seen to support some of them - there were a large number of command blunders which screwed up the plans of both sides for no apparent reason. I am happy to accept these as a bit of fun, but I can understand the reservations of some gamers. In BKC2 there is a rule allowing the CO to re-order units that failed to receive any orders from their HQ. This is a good and simple adaption which means players can bring some command focus to bear via a well placed commanding officer.
Paul rang the changes by bringing round some beer. This meant drinking Speckled Hen from cans, but then (as they say) war is hell!
6 comments:
Nice to see your 6mm stuff getting an outing Keith and as always a nice report with some interesting points to ponder.
When I get my 3mm forces together I shall certainly be giving this scenario a try.
As for command blunders, I vaguely remember that some members of the BKC forum have used a D12 rather than 2D6.
With regards to the M11/39, maybe the 1/40 represents the cramped crew compartment and the reduced rate of fire caused by this. I like the addition of the 1/20 for the Vickers MkVI and I will certainly use this in future games.
Good write up, I like your analysis of the rules as you go along, as well...
Command blunders are all well and good - and I'm reading that article too - but if they're trying to model command friction then the results have to be explainable in my own mind, and I do have problems with wildly varying results from one turn to the next... personally we ignore the CinC being able to give orders when all else has failed as it smacks a bit of a fudge.. I can't think of how that would happen in real life... D12 sounds interesting, but you lose the 2D6 bell curve which must affect the flow....
According to this website
http://www.comandosupremo.com/CarroM1139.html
...the tank only had a crew of 3 - with one driver and one commander the gun would only have one to load aim and fire... being in the main hull I think SteveJ. has it as well.....
Sorry - lots of writing... :o))
We certainly had more than our fair share of blunders in this game, many more than is normal. I would liken them to the old school idea of tactical chance cards, designed to create the odd unusual event and add some unpredictability.
I have read a number of articles and comments in past years about the need to take away the godlike all-seeing, all-knowing advantages of the wargamer. For me, the warmaster system does that job in a simple way that doesn't slow the game. I love the way fortune can swing back and forth, but I feel there is still plenty of room for generalship and tactical awareness.
Despite my keen interest in the historical background, I take the view that wargames are 'an entertainment with toy soldiers' (to quote Black Powder), although I quite understand the warmaster system isn't for everyone.
Steve -the -Wargamer, your comments got me reading that article again. You say 'I can't think of how that would happen in real life', but Mr Brown seems to disagree (p.11, bottom left of page); 'I can recall numerous occasions where higher level commanding officers directly interfered at a lower level to get things going...'. This what the BKC rule tries to replicate, surely. In fact, I'm thinking of adding the same concept to my Black Powder games.
BTW, thanks to both Steve's for taking the time to provide some input.
|Cheers, Keith
The following is taken from an article on the ever excellent WarandGame website which Edward on the BKC Forum kindly posted(linked below):
http://warandgame.com/2008/08/10/italian-10th-army%E2%80%99s-campaign-into-egypt/
"The first engagement in which the Italians employed their M.11 tanks against British armor occurred on the 5 August 1940. A small Raggruppamento, composed of one platoon of motorcycle Bersaglieri, artillery, a company of L.3 tanks and a company of M11/39 tanks engaged a British column formed by armored cars, tanks and artillery. The Italians won the engagement capturing two British tanks and destroying two other British tanks. The tanks captured were of the cruiser A.9 type which the Italians placed into their own service, helping to supplement their medium tank forces. The Italians had three M11/39s damaged by artillery fire during the engagement. These M11 medium tanks were later recovered and repaired at the workshops in Bardia.
There is only one English history account of this action. None of the British or Commonwealth official histories mention this engagement, which did occur and was considered an Italian tactical victory. Kenneth Macsey takes the following account from “Beda Fomm.”
The Italians were getting stronger and stronger and toward the end of July, and felt able to start the ball rolling themselves, sending up two infantry divisions supported by a few tanks – Medium M11/39s.
This force presented the British Tanks for the first time with something they could not easily overcome, particularly since the Italian artillery was handled with both aggression and skill. Keeping the British at long range they posed a tactical problem which was clearly stated in the history of the 7th Hussars, who had two tank squadrons engaged on the 29th of June: “if the tanks halt so as to engage the guns accurately, they in turn become targets for the guns. If they do not halt, they are still quite good targets and at the same time nothing but a fluke shot from the moving tank would hit an enemy gun.
So the 7th Hussars were persuaded to pull back while the tanks of the 6th Royal tank regiment, 7th Armored Division, sent forward to support them, were ordered to refrain from rushing the three Italian batteries which were putting up a truly formidable display, Never less, as dusk began to fall, it was decided to attempt a night attack.
. . . and rush at speed against the enemy batteries using Vickers machine guns continuously during such an advance,” to quote orders from the 7th Hussars. At once the there came a dazzling blaze of fire from the Italian guns, tracer flying all over the place and, out of the gloom, three Italian M11s advancing, one of which rammed a British Tank. Again the British backed off after one of their cruisers had deflected a 37mm shot at point blank range, and still the Italian gunners stuck it out, through now being fired at by British 25 pounder artillery from long range. (Macksey 1971, 19)
The Italian mechanized doctrine proved to be successful when used with the right equipment in a combined arms role. The M.11 medium tank proved capable of the task to be accomplished, even though it had some shortcomings. In this battle the tanks cooperated with the artillery, infantry and Italian medium tanks. The M.11 tank could stand up to the British armor then fielded in the Western Desert. Still after its first engagement Colonel Aresca, commander of the armor regiment, assigned to the Babini armored brigade, published a number of lessons learned."
Sorry for the length of the post, but I think it is worth it for the information that it contains.
found it interesting that the Rolls Royce armoured cars were able to pierce th L3/33 tankettes armour with their AP MG ammo. So infuture Western Desert games I will be giving them 1/20 AT attacks as per the Vickers MKVI tanks.
Enjoyed these posts a lot. Just purchased BKC IV, but I am also looking at using the scenarios in Spearhead. These certainly save a lot of research on OBs and other aspects. I do want to pick up "Benghazi Handicap" for the rest of the scenarios, but copies are rather pricey when available these days.
Post a Comment