A long post to conclude this project, with a battle report using the
Blitzkrieg Commander rules and including a full scenario and forces. New readers should refer to
this post which explains how the whole thing got started and why the events of 10th May 1940 have been transposed to 1st September 1939.
Attack on Danzig/Langfuhr - Poland, 1st September 1939
It
is the first day of the German invasion of Poland. Determined to exploit their
new airborne forces, the Germans have planned a dawn attack on Danzig's airfield in order to hasten the taking of the city.
A combined assault by parachute and airlanding forces, supported by ground
attack aircraft, is designed to capture the airfield and nearby communications
links before moving into the city to join up with paramilitary and SS units
already in place.
The
assault will be met initially mainly by low grade Polish units belonging to the
local garrison, some of whom are present on the airfield with the remainder
located nearby. The airfield also has a significant AA defence. A regular
Polish infantry battalion is available a little further from the airfield,
supported by artillery.
The
aircraft based at the airfield have already been scrambled to intercept the
various air attacks mounted by the Germans. They have suffered heavily and the
survivors have been forced to disperse to other locations. Polish air attacks
on the assaulting Germans will take place in the face of full German air
superiority.
Wargames Summary
The name of Danzig's airfield has been adopted for the game to provide a little local flavour, but the game is firmly based on events at Ypenburg airfield in Holland on 10th May 1940. In reality, German airborne forces, and particularly the 22nd Airlanding Division, were not ready or even formed for an operation of this nature in 1939.
The game is scheduled to last 12 moves. It commences with the landing of a parachute battalion on 2 DZs to the north and west of the airfield. The paras are under orders to capture or suppress the airfield defences in advance of the arrival of a regiment of infantry from an airlanding division. Polish defences on the airfield consist of a battalion strength force of low grade infantry and machine gunners supported by an armoured car company and the airfield's AA defences.
On move 3 the Ju52s start to arrive with the airlanding troops on board. The Poles will receive some conscript rated reinforcements on move 3 as well, followed by a regular formation supported by artillery from move 6 (provided the latter can make their command rolls). Polish reinforcements arrive by road according to a dice throw - see map and detailed scenario below. German intentions are to capture the airfield itself (their primary objective), then the associated hangars and buildings, and finally the bridge leading to the city. The latter 2 locations are designated secondary objectives. Victory conditions are summarised in the following table:
GERMANS CAPTURE
|
GERMAN RESULT
|
POLISH RESULT
|
Airfield + both secondary
objectives
|
Brilliant Victory
|
Miserable Failure
|
Airfield + 1 secondary
objective
|
Victory
|
Failure
|
Airfield only
|
Draw
|
Draw
|
Both secondary objectives
only
|
Draw
|
Draw
|
1 secondary
objective only
|
Failure
|
Victory
|
Nothing
|
Miserable Failure
|
Brilliant Victory
|
The table is 6' x 6', set up as below:
 |
| Oh Lord, he's been at the coloured pens again... |
German Forces
Flexible tactical doctrine. Full air superiority. Germans
take first turn.
Fallschirmjager
Battalion (elite)
CO CV 10
HQ CV 9
9 infantry units
3 mg units
1 mortar unit
Airlanding Regiment
Regimental HQ
CO CV 9
FAC CV 7
1 mg unit
1 mortar unit
3 engineer units
1 37mm ATG
1 75mm IG
1 m/c unit (recce)
2 Battalions each:
HQ CV8
9 infantry units
3 mg units
Air Support
2 Ju87 units (scheduled raid before game start only)
1 HS-123 unit (available once FAC has landed)
8 Ju52 transport units
44 units. BP = 22.
Fallschirmjaeger Deployment
These
arrive in the scheduled phase of move 1. Place the CO in DZ North and the HQ in DZ West. Dice as per normal rules to decide displaced landing positions but use 3 dice for displacement. Allocate units to each
command unit by dicing 50/50 and place these on table as per normal rules. Then
dice again for each unit: 1 or 2 means misdropped: arrive on the nearest table
edge at the start of move 3.
The
mortar unit must complete a deploy move before being able to fire.
Airlanding Deployment
Airlanding
units are planned to arrive in waves of 4 aircraft. Each Ju-52 can carry 2 infantry units or 1 support unit. The first wave arrives in
the scheduled phase of move 3, the remaining waves arriving one per move
thereafter.
Planned
a/c loads are:
1st
wave: 1/CO+mg; 2/HQ+infantry; 3/mg+infantry; 4/2xinfantry
2nd
wave: 1/HQ+mortar; 2/mg+infantry; 3/2xinfantry; 4/2xinfantry
3rd
wave: 1/mg+FAC; 2/mg+infantry; 3/2xengineers; 4/infantry+engineer
4th
wave: 1/mg+infantry; 2/mg+infantry; 3/37mm ATG; 4/75mm IG
5th
wave: 1/2xinfantry; 2/2xinfantry; 3/1xinfantry; 4/m/c unit (recce)
Roll
5 D6 and a direction dice from the runway intersection to decide where each a/c
actually lands. If this creates an overlap with a previously landed aircraft, a
throw of 1 indicates a collision and both a/c are destroyed. Otherwise, place
the landing aircraft as close to its landing point as possible.
Complete
AA fire against each a/c based on its actual landing point. This counts as
initiative fire. KO’d a/c are left in place with all units on board destroyed.
Aborted a/c are removed and are added to the next wave. Hits registered by AA
on a/c that land successfully are divided between the units carried; roll for
suppression as normal.
Units
on a/c that land successfully deploy automatically. Place the units in contact
with their a/c. The a/c will take off again during the end phase of the Polish player turn on a die roll of 4 or more (provided they have not been destroyed whilst
on the ground): those that take off return to the a/c reserve. Those that fail may
attempt to depart the next move under the same rules.
A/c
will continue to arrive in waves until all units are landed or destroyed, or
all a/c are destroyed. Ju-52s have 3 hits.
Replacing German Command Units
Use
standard rules, but parachute command units deploy in DZ under rules used at
game start. Air landing command units deploy on airfield at runway
intersection.
Polish Forces
Normal
tactical doctrine. No air superiority.
Airfield
and Bridge Defence Group
CO
CV 8 (command post available)
HQ
CV 7
Armoured car Company
– 2 Wz.34 (mg), 1 Wz.29 (37mm), 1 m/c infantry unit
AA Company
– 2 Bofors 40mm, 2 AAmg
MG Company
– 3 mg units (conscripts)
Infantry
Company – 3 infantry units (conscripts)
N.B.
– at least 2 units must be deployed to defend the bridge. All units may be dug
in.
Reserve
Units
Motorised Infantry Battalion (guaranteed arrival on move 3)
HQ
CV 7
6
infantry units in 3 trucks (conscript)
Motorised Infantry Battalion (arrive
from move 6, using mobile deployment)
HQ
CV 8
4
infantry units in 2 trucks
2
m/c infantry units
2 mg
units in jeeps
1
mortar unit in truck
Artillery Battalion (deploy off table
move 6, FAC arrives same move)
FAO
CV 6
2
75mm artillery units, 1 100mm artillery unit.
Karas Squadron (scheduled attacks on
moves 4,5,6)
1
Karas unit, 3 assets
28
units. BP = 14
Reserve arrival
Dice
for the road on which each reserve formation arrives (see map):
1 or
2 = NW road
3 or
4 = SW road
5 =
NE road
6 =
SE road
Karas
can only attack German units on the airfield – write down aiming point in the end
phase of the previous turn.
AA Fire
MG
units and armoured cars with mgs may engage landing JU-52s, using AAmg stats
(1/30). Rules for AA fire were altered to suit our preferences for this game: No AA unit may engage both air and ground targets in the same player turn. However, AA fire against enemy a/c is allowed in both the scheduled and command phases of the enemy player turn, and AA units may then engage ground targets in their own player turn. If they have already engaged aircraft in the enemy turn, they cannot fire in their initiative phase and are subject to a -1 command modifier in their command phase.
Replacing Polish command units
Use
standard rules, but replacements deploy on baseline on any road from which
reinforcements have arrived.
The Game in Pictures
 |
| Table set up. This was my first attempt at using my new camera, so excuse any quality problems. |
 |
| As in the original battle, the armoured car company started the day deployed around the airfield buildings. To the left is the command post of the CO of the defending forces. To the right is a 40mm Bofors AA position, and in the left background the bridge objective. |
 |
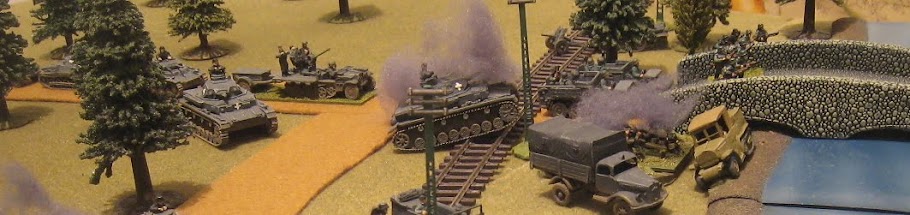
| Fast forwarding to move 3, the first wave has arrived and German infantry advance to attack the Polish defenders. |
 |
| Karas attacks on moves 4, 5 and 6 were ineffective, 2 of them being turned away by German fighters before they even arrived over the airfield. |
 |
| A burning Ju52 near the airport buildings. |
 |
| The first set of Polish reinforcements arrived conveniently along the bridge road, immediately securing this objective. |
 |
| More Ju52s arriving. AA fire claimed some, but many were destroyed on the ground before they could take off again. |
 |
| Transport planes pile up on the airfield. Sorting the airlanding troops out into battle formation and getting them moving towards their objectives turned out to be slow work. |
 |
| After the first 2 waves, casualties amongst the transport planes meant the rate of reinforcement slowed down. Here, the 4th wave can muster only 2 planes. |
 |
| The Polish regulars arrived on time on the south western road. Unusually lucky with their command rolls, they deployed quickly to engage German forces on the airfield as well as the remaining paras from DZ West. |
 |
| An HS-123 strike against the airfield defences witnesses the confusion of burning planes on the airfield on move 7. |
 |
| On the ground, German troops are making slow progress and have yet to assault the airfield buildings. |
 |
| The Polish regulars in position at the south western airfield boundary. The German paras were much depleted by this stage. In the background Polish forces can be seen at the bridge. |
 |
| The German airlanding CO desperately tries to make sense of events in the shadow of the burning Junkers. The Polish armoured cars continue to put up a spirited defence. |
Conclusion
We wargamed from 5.00pm to 10.00pm, but still had to stop at the end of 8 moves. As WW2 wargamers will know, infantry-heavy battles tend to take longer than those using mainly tanks, as the details of infantry combat are simply more time consuming, regardless of which rules you use.
We both concluded that this would be a good scenario to take to a wargames convention where it would easily fill the whole day. As it was, the Germans had clearly secured the airfield itself, had no chance of securing the bridge, but might just have captured the airfield buildings given 12 moves. Interestingly, however, the Germans had suffered 19 units destroyed from their breakpoint of 22, whilst the Poles had suffered just 1 (that's one) unit destroyed! The German paras had suffered particularly heavily in desperate attacks on the airfield defences. We called it a draw.