So here we are then. Inspired by the Jack Scruby map from All About War Games (see post for 22nd January below), I developed and played a scenario to test out my rules and continue with my return to wargaming.
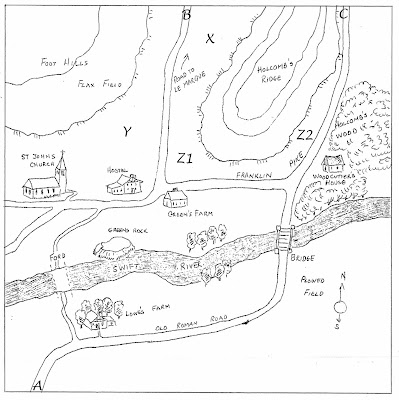
The original map came out with proportions of 6' x 5', so to fit my 6' x 6' set up I added 6" top and bottom, resulting in the map below (which is also mildly enhanced and tidied up). For the game some of the names on the map were 'Germanised'.
Scenario - Austria vs Prussia, 1757.
Austria
Feldmarschall-lieutenant Weisser is in charge of a force of a little under 4,000 infantry, 1,200 cavalry and 2 artillery batteries. His mission is to block the crossings of the Schnellfliessend south of the straggling village of St. Johannes, preventing the northward movement of any Prussian forces.
As dawn breaks on this particular day, Weisser and his senior officers are all gathered at the Johanneskirche for a discussion of plans and a brief religious service. Suddenly a small patrol of Grenzers enters the church with news of the approach of a significant force of Prussians, moving up the road from the south-west. Had his cavalry commander not been such a fool, Weisser might have heard sooner! He must alert his troops and get them positioned to counter the Prussian drive.
Forces:
Camped at X - 3 infantry battalions, 1 medium battery.
Camped at Y - 2 infantry battalions.
Camped at Z1 - regiment of dragoons.
Camped at Z2 - regiment of hussars.
At the woodcutters settlement - 1 Grenz battalion, 1 light battery.
At Greens Rock - 1 Grenz battalion.
The brigade commanders must ride out from the church to their encamped units, alert them and get them moving towards the crossing points at the ford and bridge. The Grenz units are each commanded independently, and are already awake and ready to go.
Prussia
Generallieutenant von Blau leads a force of 4,200 infantry, 2,500 cavalry and 3 artillery batteries. He has orders to cross the Schnellfliessend and continue north to join up with other Prussian forces in the hills.
Von Blau is confident that his small but high quality force will be more than a match for any Austrian outposts he meets. He is marching rapidly towards the river crossings, keeping to the road to maximise progress.
Forces:
Infantry brigade of 4 infantry battalions and 2 medium batteries.
Infantry brigade of 3 grenadier battalions and 1 medium battery.
Cavalry brigade of 2 cuirassier regiments.Cavalry brigade of 2 dragoon regiments.
All units must enter the table in column along the road from A.
Photos
I managed to set up a reasonable representation of the original terrain.
Things went fairly well for the Prussians at first, aided by their higher graded commanders.
Here they have managed to get the dragoon brigade across the bridge with the larger of the the 2 infantry brigades strung out behind. But the Austrian cavalry was in place just in time - at extreme right you can see the Austrian hussars charging the leading Prussian dragoons.
A few moves later things are not so rosy for the invaders. The Austrian dragoons have been seen off but the Austrian hussars excel themselves and rout one of the Prussian regiments, supported by fire from the Grenzers' light artillery.
At the ford the Austrians manage to get their infantry into a blocking position ready to receive the Prussian grenadiers and cuirassiers, who have been stuck in a queue behind the leading brigades. A devastating volley from the first grenadier regiment pushes back one of the Austrian battalions,
but a stalemate then ensues.
The Prussians were unable to establish themselves north of the bridge - as each infantry battalion charged over, it was shot to pieces by the ambushing Grenzers and their artillery support, along with long range fire from another Austrian battery you can see in the middle distance. 2 infantry battalions and the 2 regiments of dragoons are done for and there is obviously no point in sacrificing more men. A victory for the Austrians, in 9 moves and about 2 hours of solo gaming.
Conclusions
I think the scenario is a bit of a tall order for the Prussians: that long and winding approach along the road from 'A' gives the Austrians too much time to get organised. Despite some initial bad luck which slowed the activation of the Austrian brigades, they were able to stem the Prussian tide fairly easily.
If I play the scenario again, I will change the terrain south of the river so a direct road leads from the baseline to each crossing point, ensuring that the Prussians can get some forces across the river. Then with luck there will be a tense battle on the north side.
Best wishes 'til the next post!


